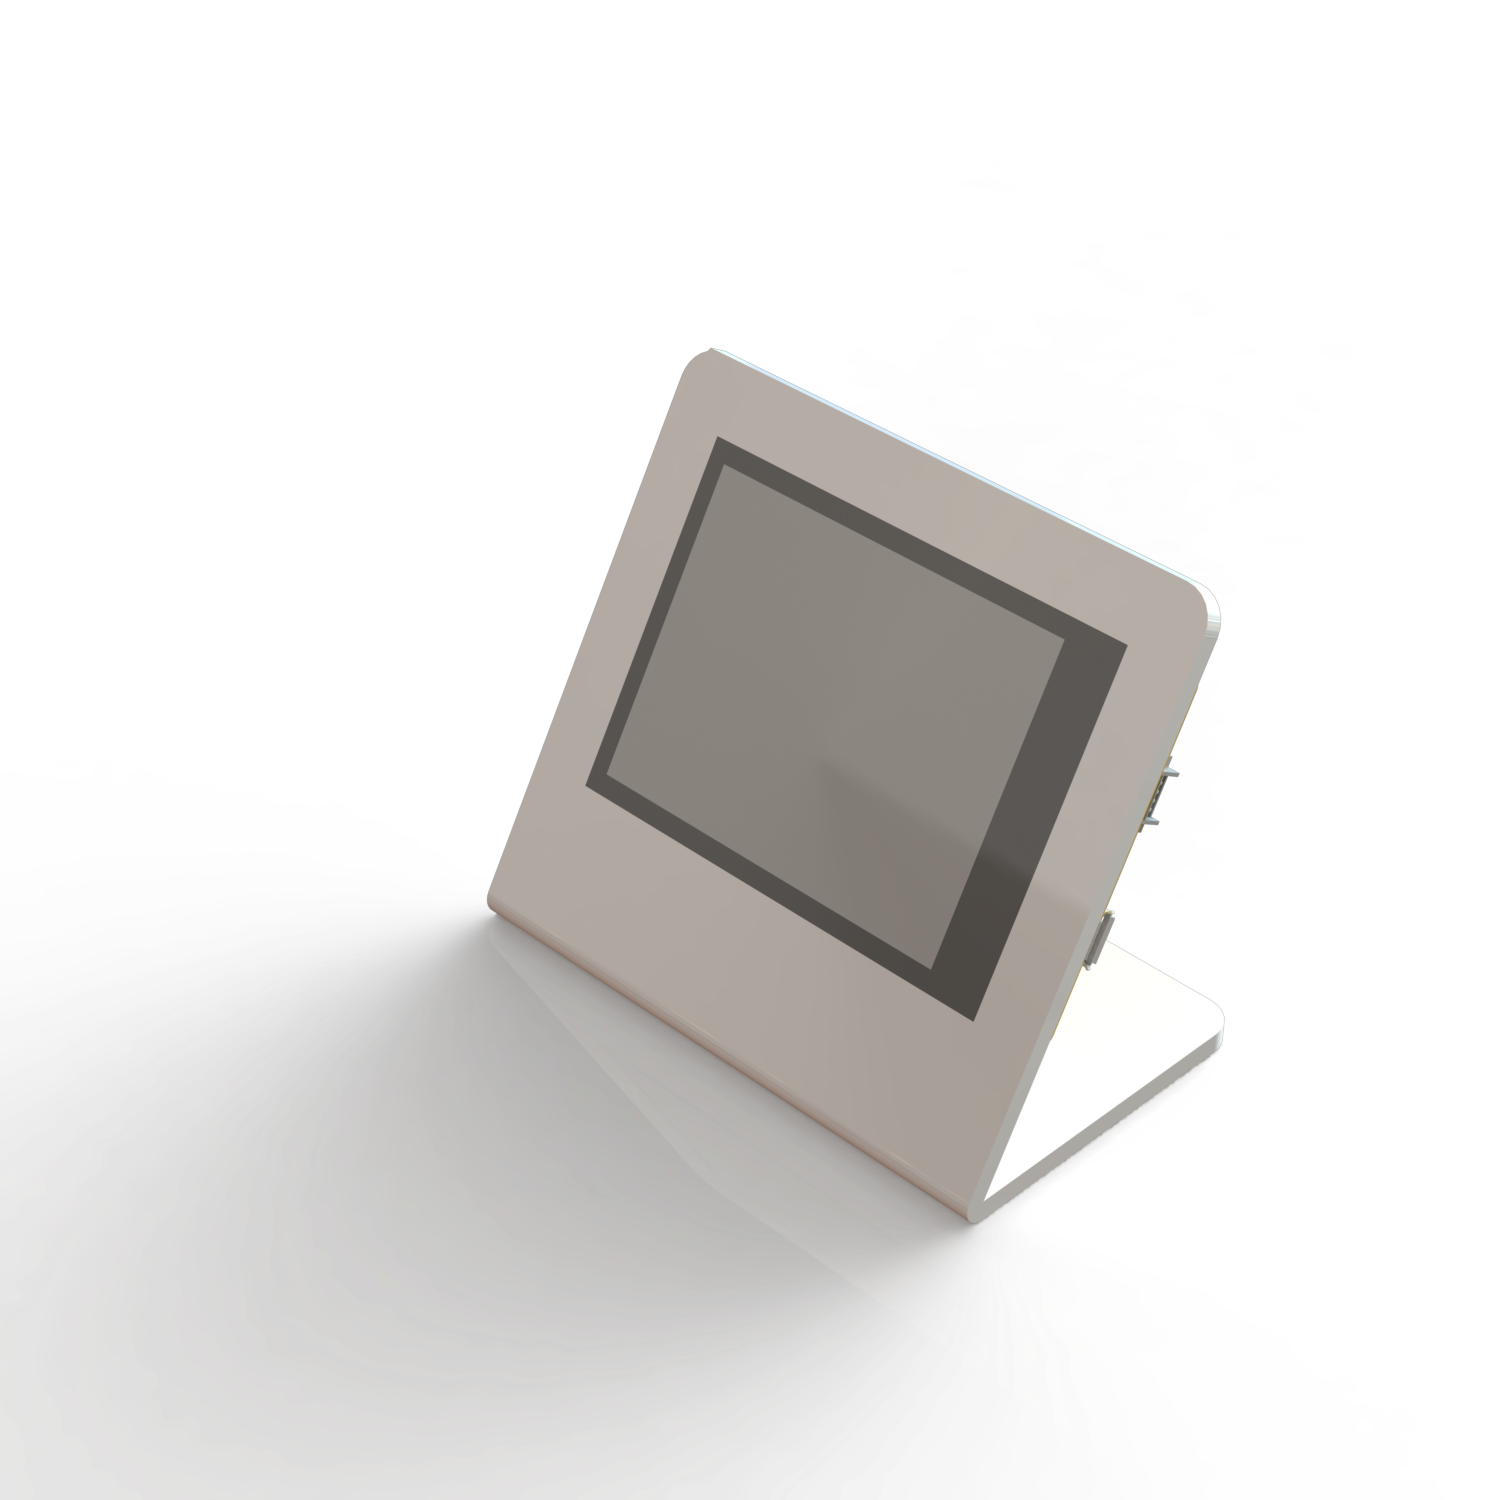
CryptoClock's User Manual
Introduction
This guide will help you understand how to set up and use your CryptoClock.
Welcome to the CryptoClock User Guide. This guide is designed to help you understand and fully utilize your CryptoClock, whether you are a new user or have previous experience. CryptoClock is not just a simple time-telling device; it is also a tool that connects you to the world of cryptocurrencies and conveniently displays the values of the cryptocurrencies you are interested in, through API connections with various exchanges. This guide will provide basic information about settings, basic operations, and advanced features that CryptoClock offers, along with troubleshooting methods for issues you may encounter. We hope this guide helps you enjoy and get the most out of your CryptoClock.
Hardware Technical
Parameters:
- Use low-power dual-core 32-bit CPU, which can be used as an application processor.
- The main frequency is up to 240MHz, and the computing power is up to 600 DMIPS.
- Built-in 520 KB SRAM.
- Support UART/SPI/I2C/PWM/ADC/DAC and other interfaces.
- Support OV2640 and OV7670 cameras, built-in flash.
- Support picture WiFI upload.
- Support TF card.
- Support multiple sleep modes.
- Embedded Lwip and FreeRTOS.
- Support STA/AP/STA+AP working mode.
- Support Smart Config/AirKiss one-click network configuration.
- Support secondary development.
Specifications:
- Working voltage 4.75-5.25V.
- SPI Flash default 32Mbit.
- RAM internal 520KB.
- Wi-Fi 802.11b/g/n/e/i.
- Bluetooth Bluetooth 4.2BR/EDR and BLE standard.
- Support interface (2Mbps) UART, SPI, I2C, PWM.
- Support TF card, maximum support 4G.
- IO port 9.
- Serial port rate default 115200bps.
- Spectrum range 2400 ~2483.5MHz.
- Antenna form Onboard PCB antenna, gain 2dBi.
- Image output format: JPEG (only OV2640 support), BMP, GRAYSCALE.
- Packaging method DIP-16.
- Transmit power 802.11b: 17±2dBm (@11Mbps), 802.11g: 14±2dBm (@54Mbps), 802.11n: 13±2dBm (@MCS7).
- Receiving sensitivity varies by mode and rate.
- Power consumption details.
- Security WPA/WPA2/WPA2-Enterprise/WPS.
- Working temperature -20 ℃~ 70 ℃.
- Storage environment -40 ℃~ 125 ℃, <90%RH.
Getting Started
-
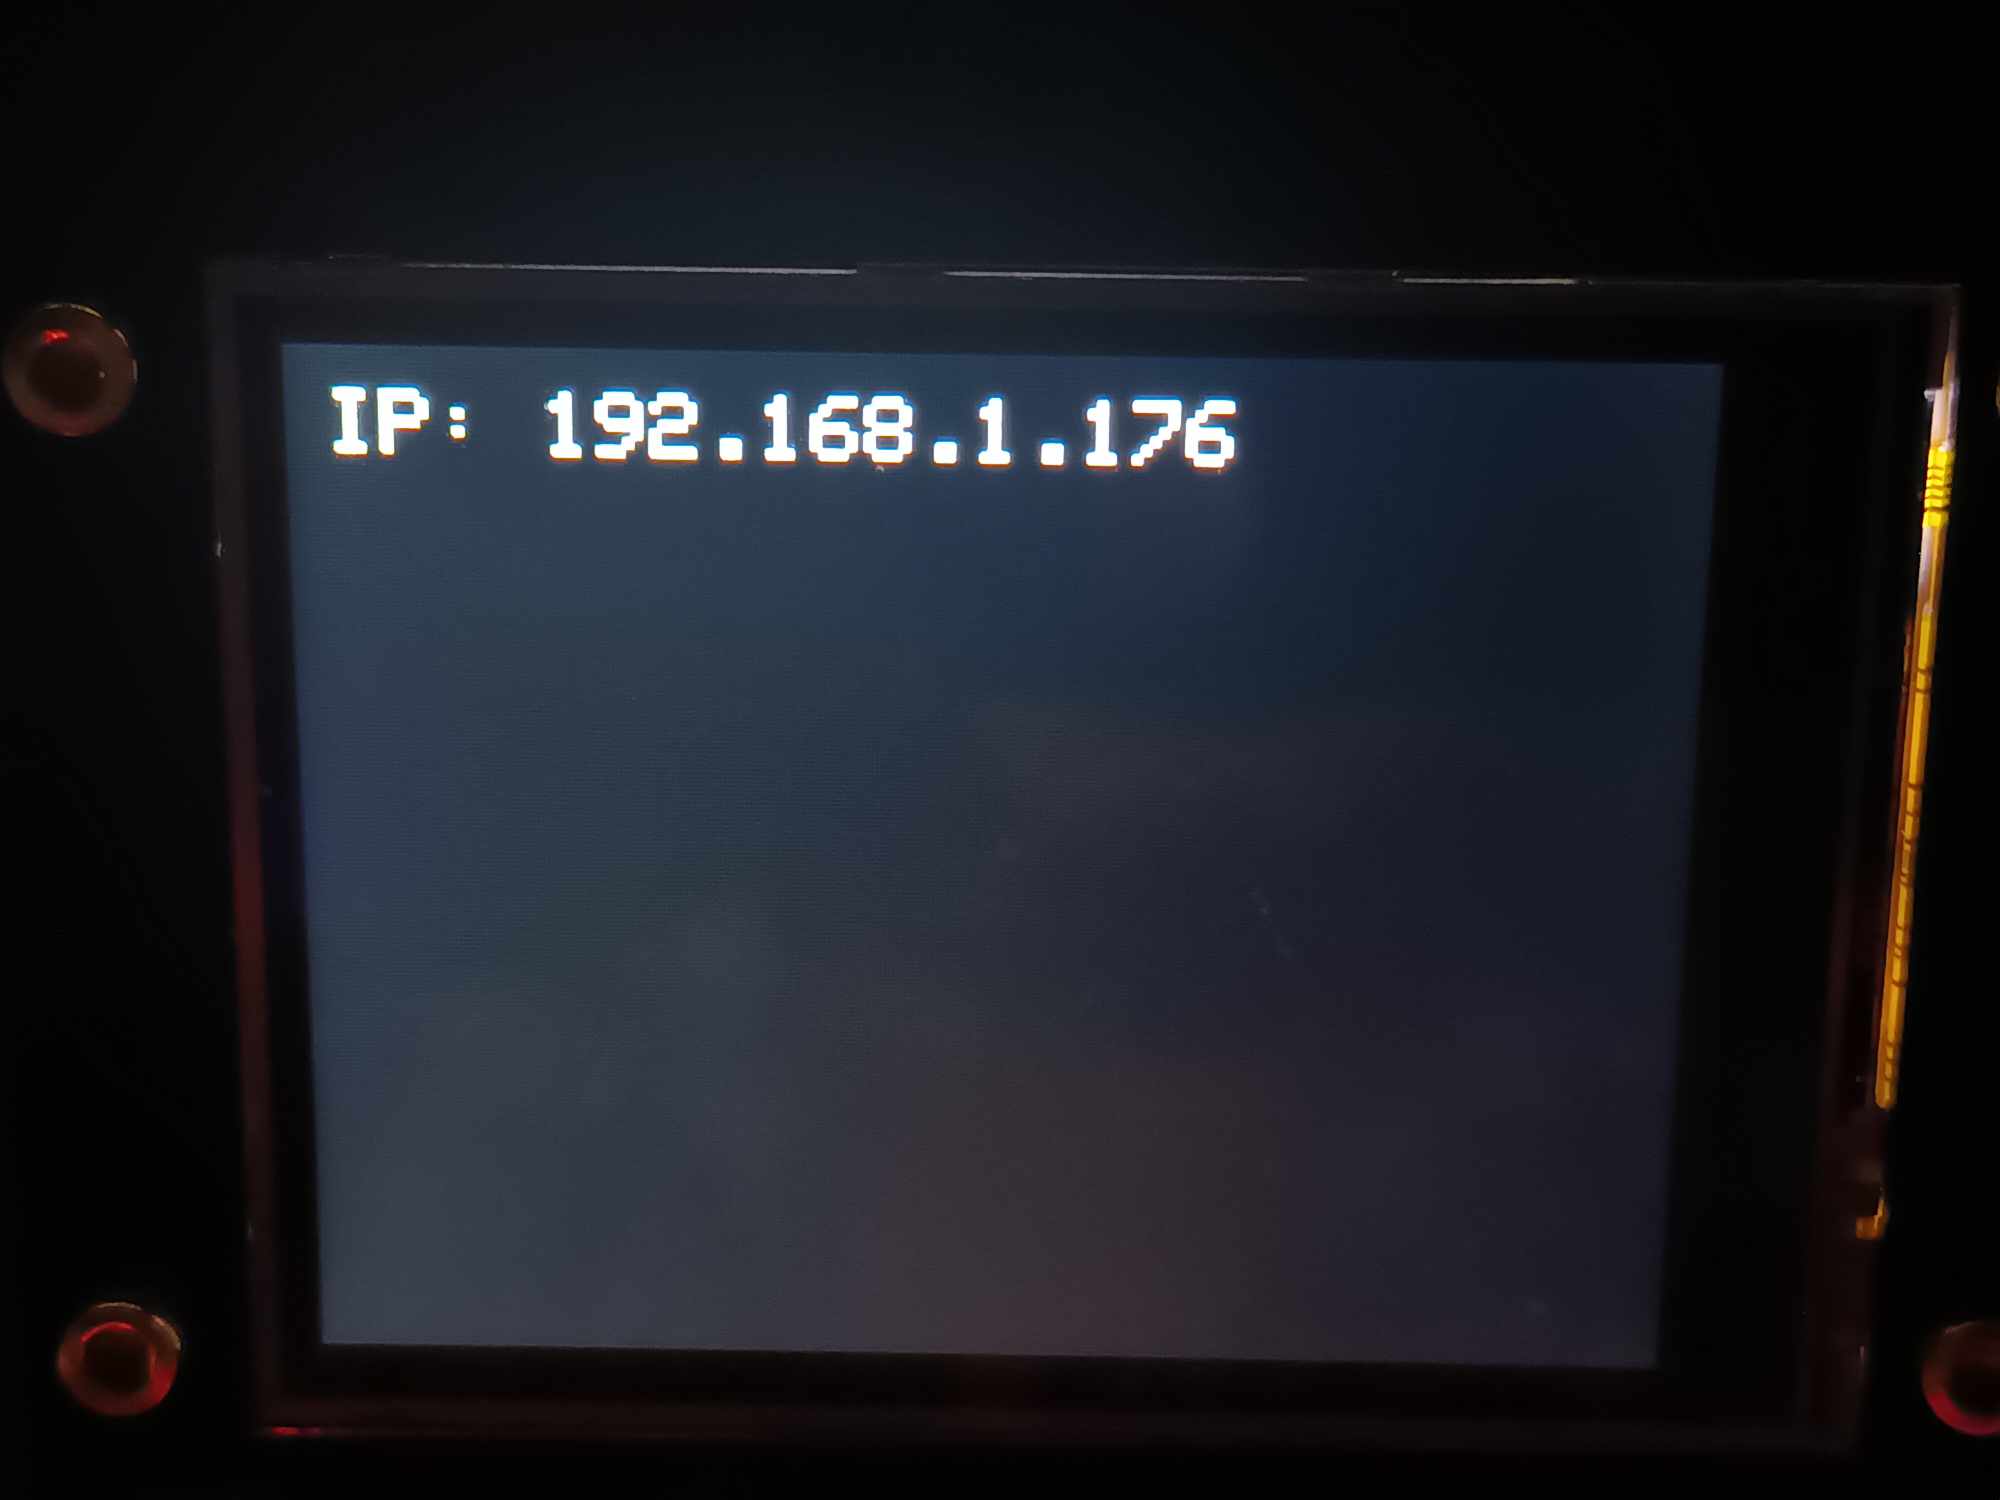
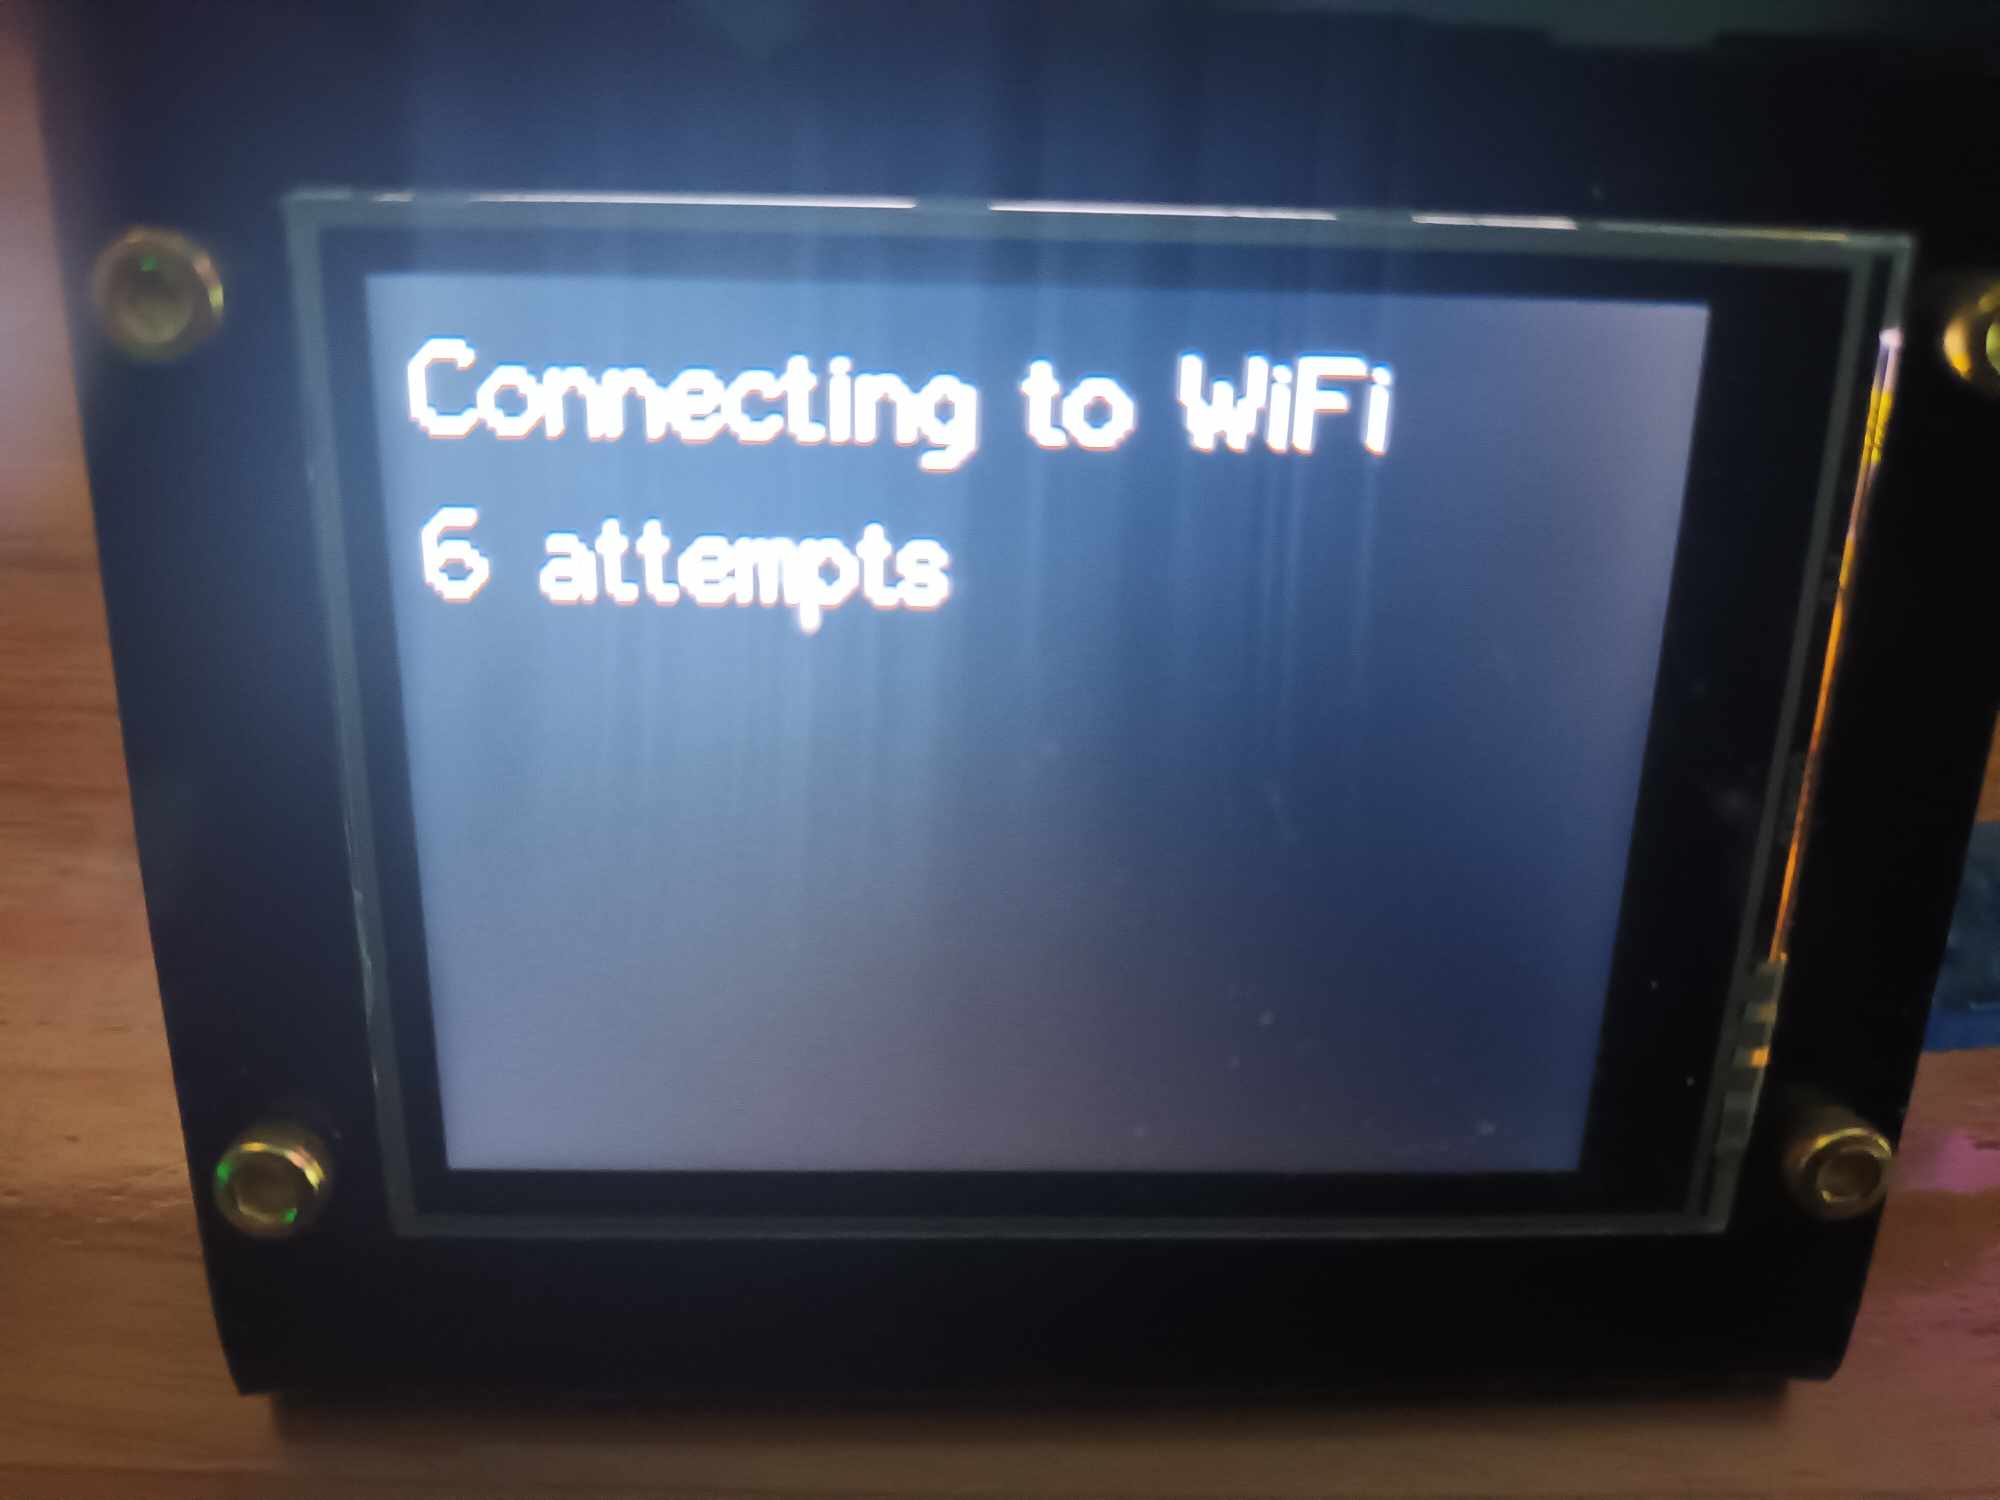
1. Learn how to connect your CryptoClock to Wi-Fi. When powered
on, the CryptoClock will search for Wi-Fi networks.
-
1.1 If Wi-Fi connection is successful, an IP will be
displayed, and you will be directed to the home or last
visited page.
-
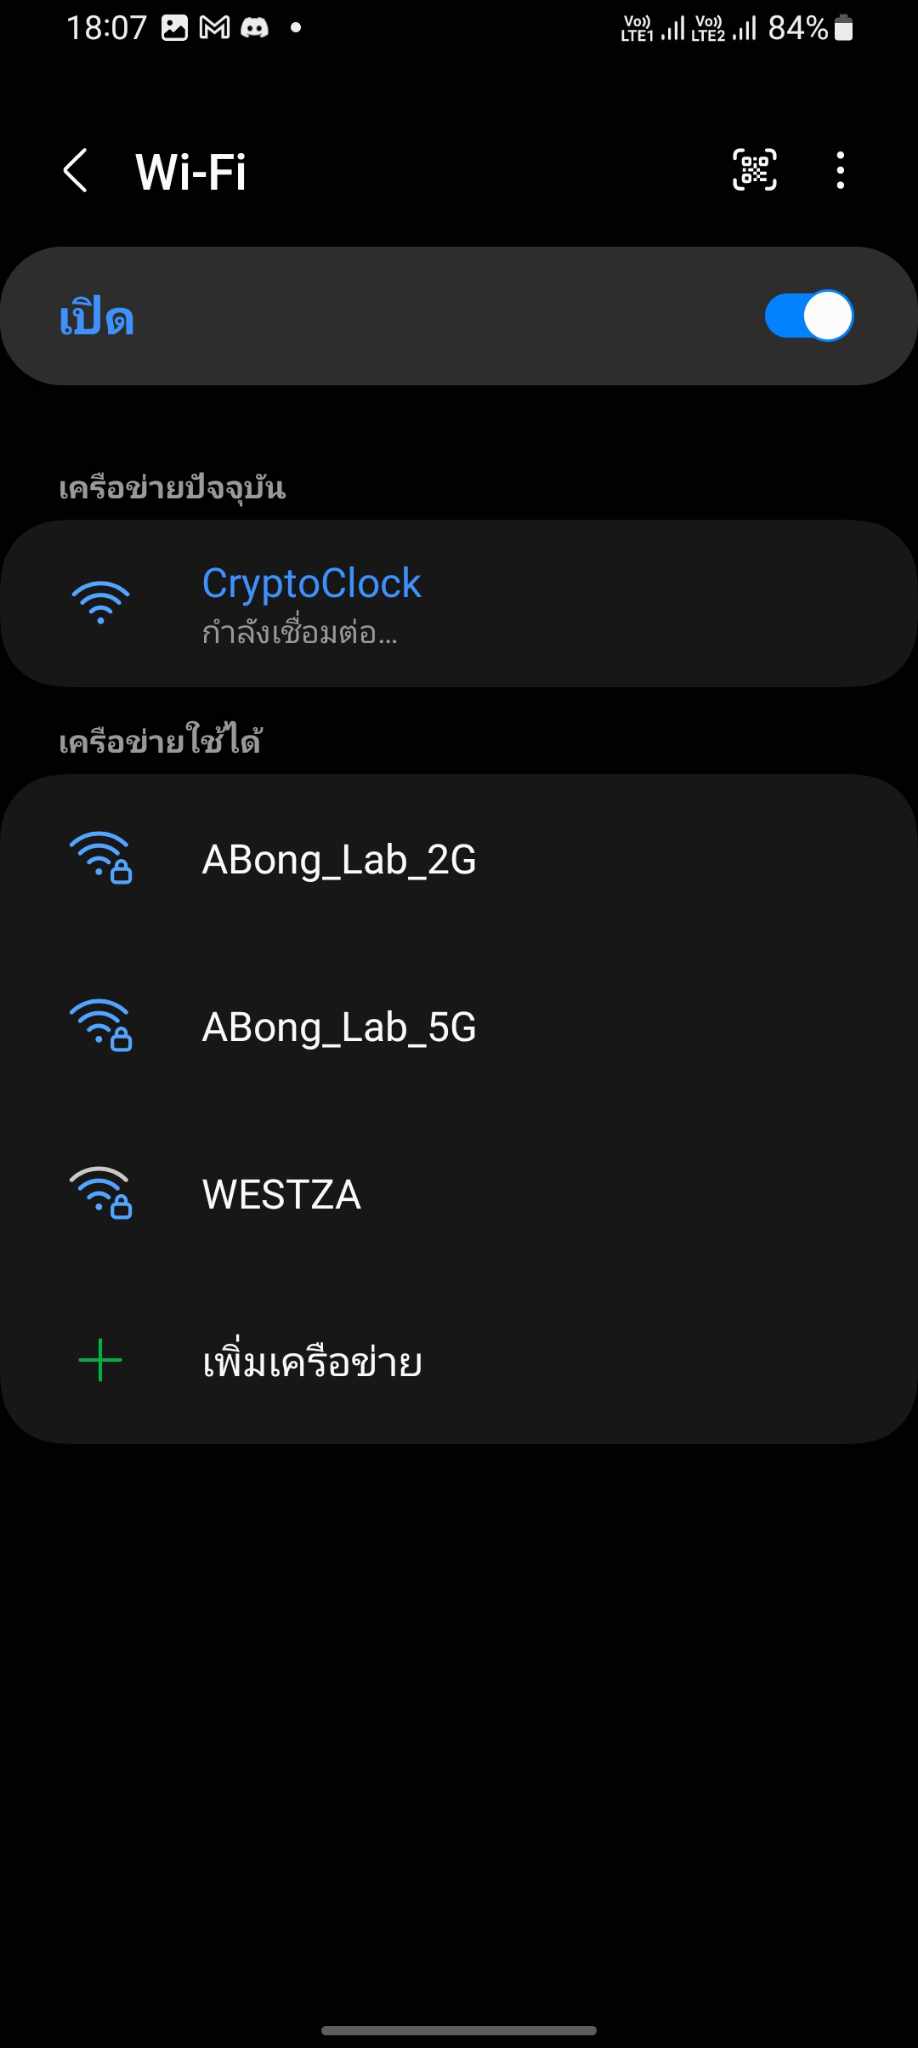
1.2 If it's your first time turning it on and the CryptoClock
cannot find Wi-Fi, it will automatically start setting up
Wi-Fi.

-
1.2.1 Connect using a smartphone or computer to the Wi-Fi
named "CryptoClock"; you may need to wait 1-2 minutes for
it to find the Wi-Fi.
-
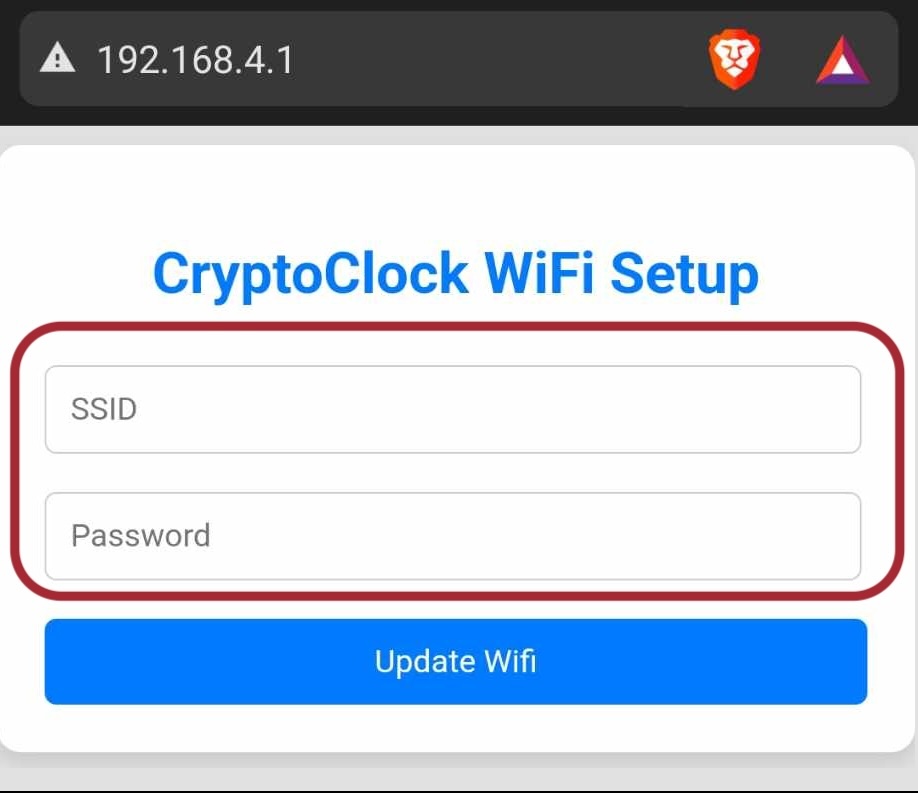
1.2.2 After connecting, scan the QR Code with your
smartphone or enter the Browser Url: 192.168.4.1 on your
computer.

-
1.2.3 Enter the SSID and password in the provided fields,
note that only 2.4GHz Wi-Fi is supported (not 5GHz).
-
1.2.4 Press the Update button and wait for a moment.
CryptoClock will save the settings and restart.
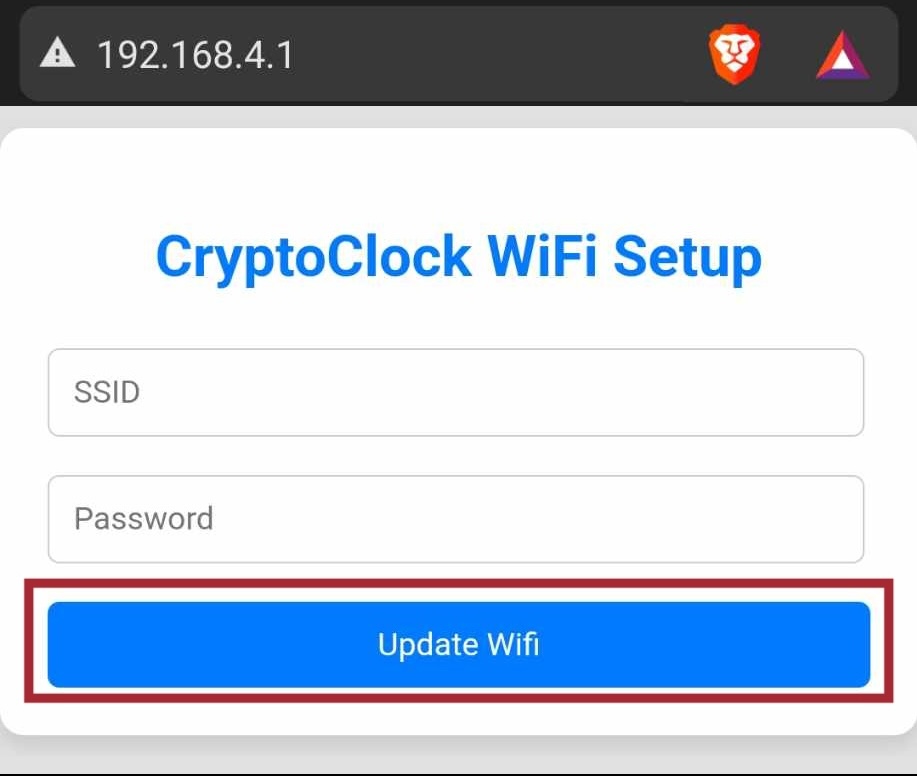
- 1.2.5 Once restarted, the Wi-Fi connection should be established. (If not, it means the SSID or password was entered incorrectly; repeat step 1.2.1.)
-
1.2.1 Connect using a smartphone or computer to the Wi-Fi
named "CryptoClock"; you may need to wait 1-2 minutes for
it to find the Wi-Fi.
-
1.1 If Wi-Fi connection is successful, an IP will be
displayed, and you will be directed to the home or last
visited page.
Basic Operation
2. Overview of the various displays on your CryptoClock
-
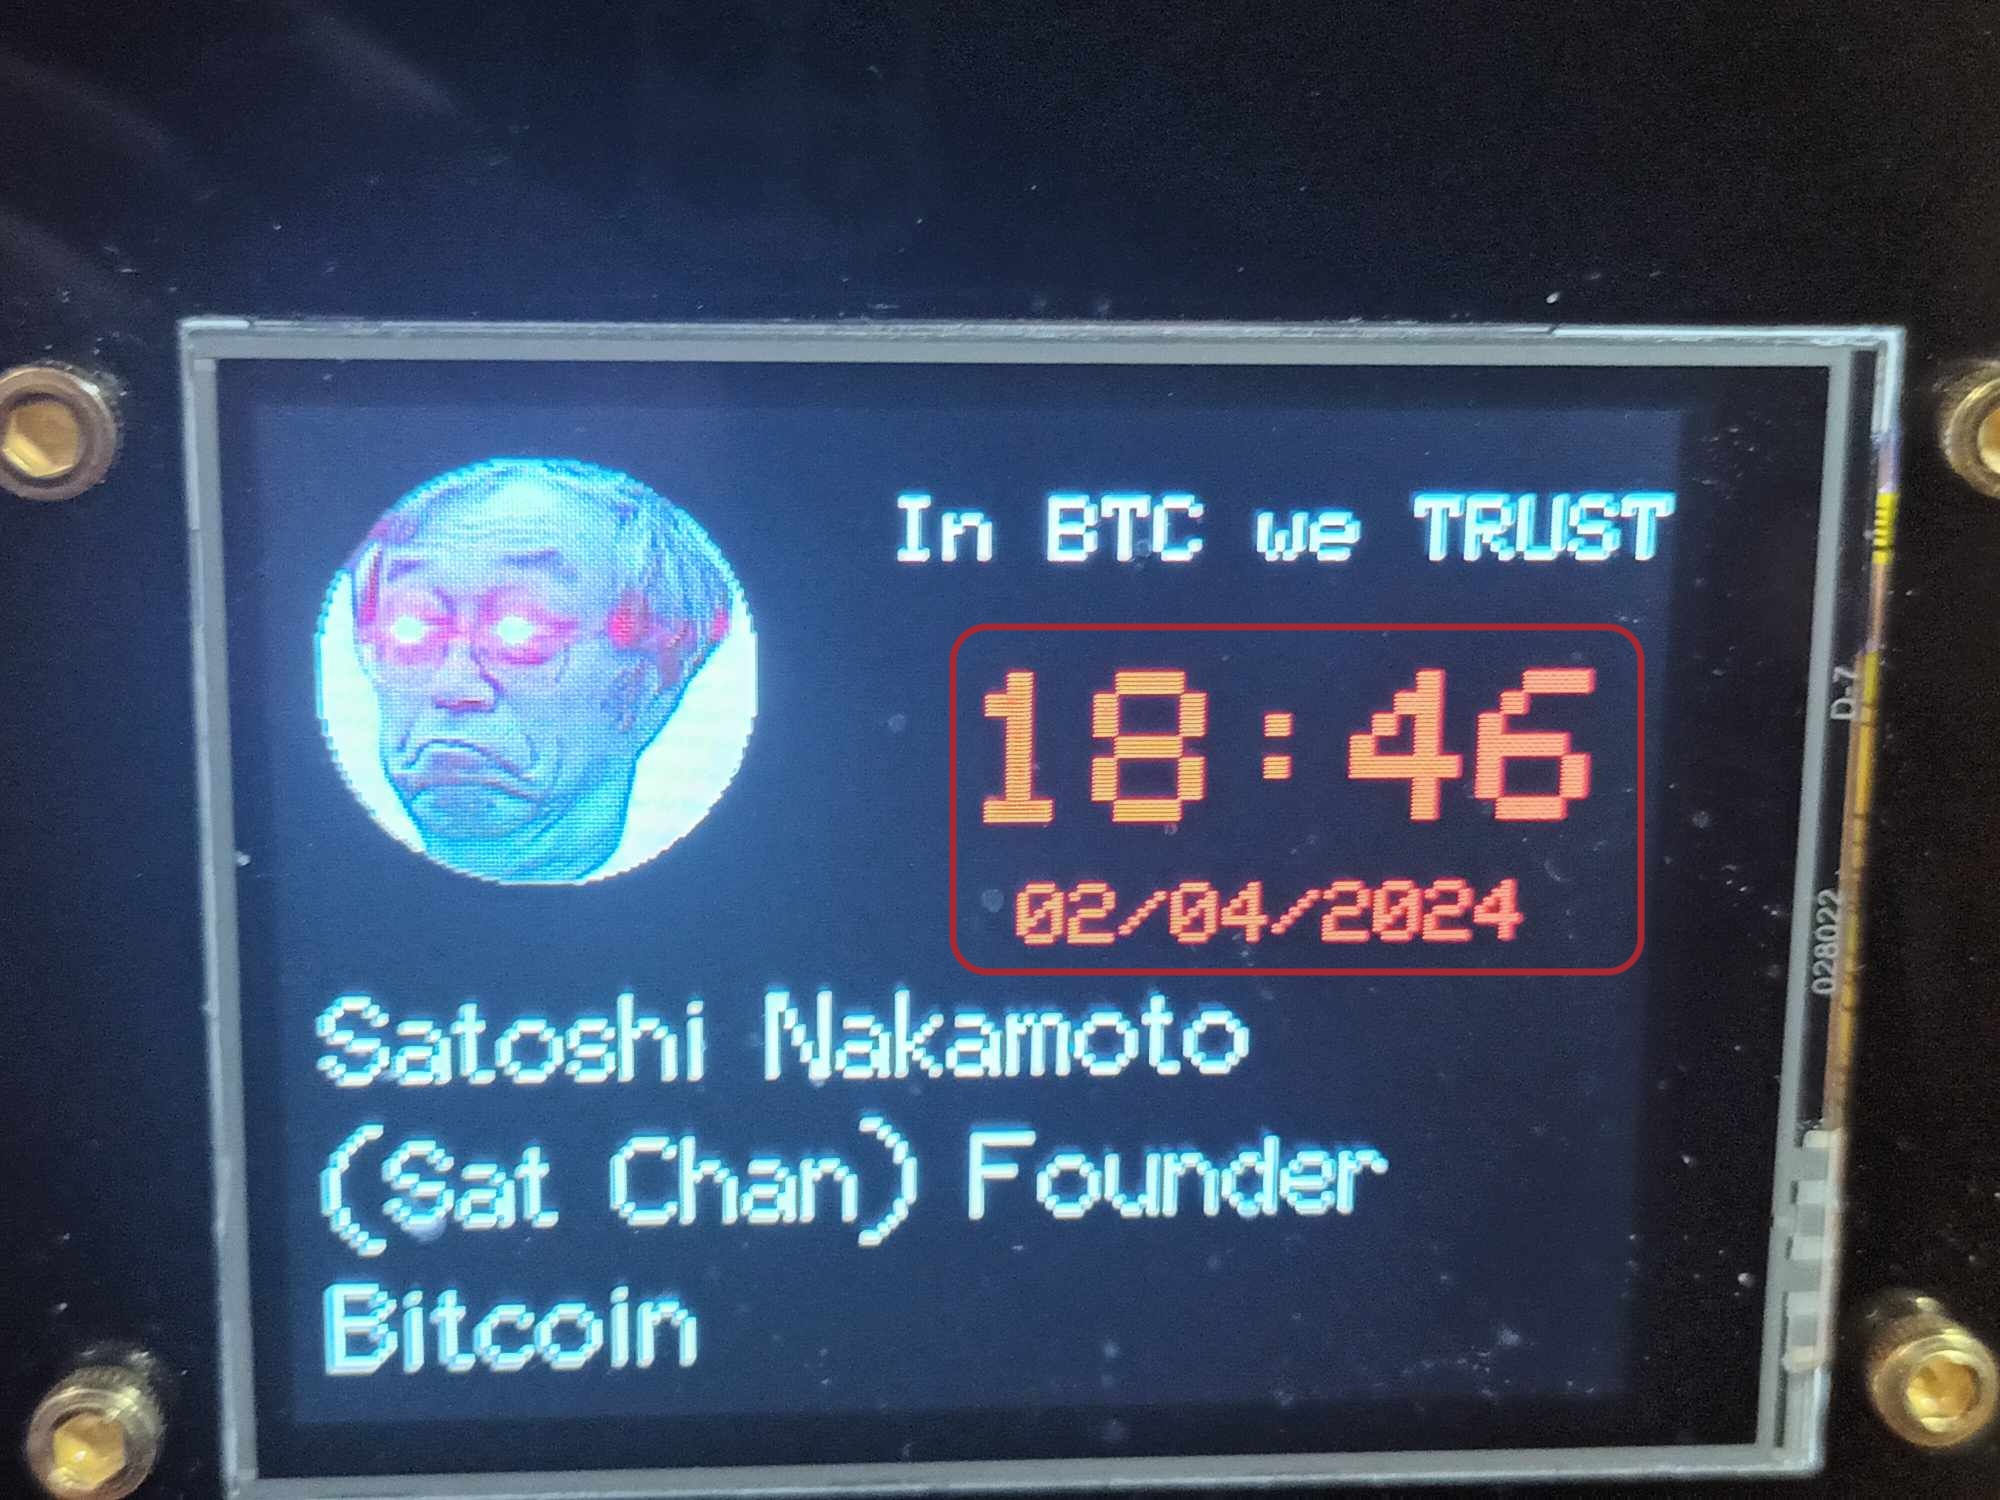
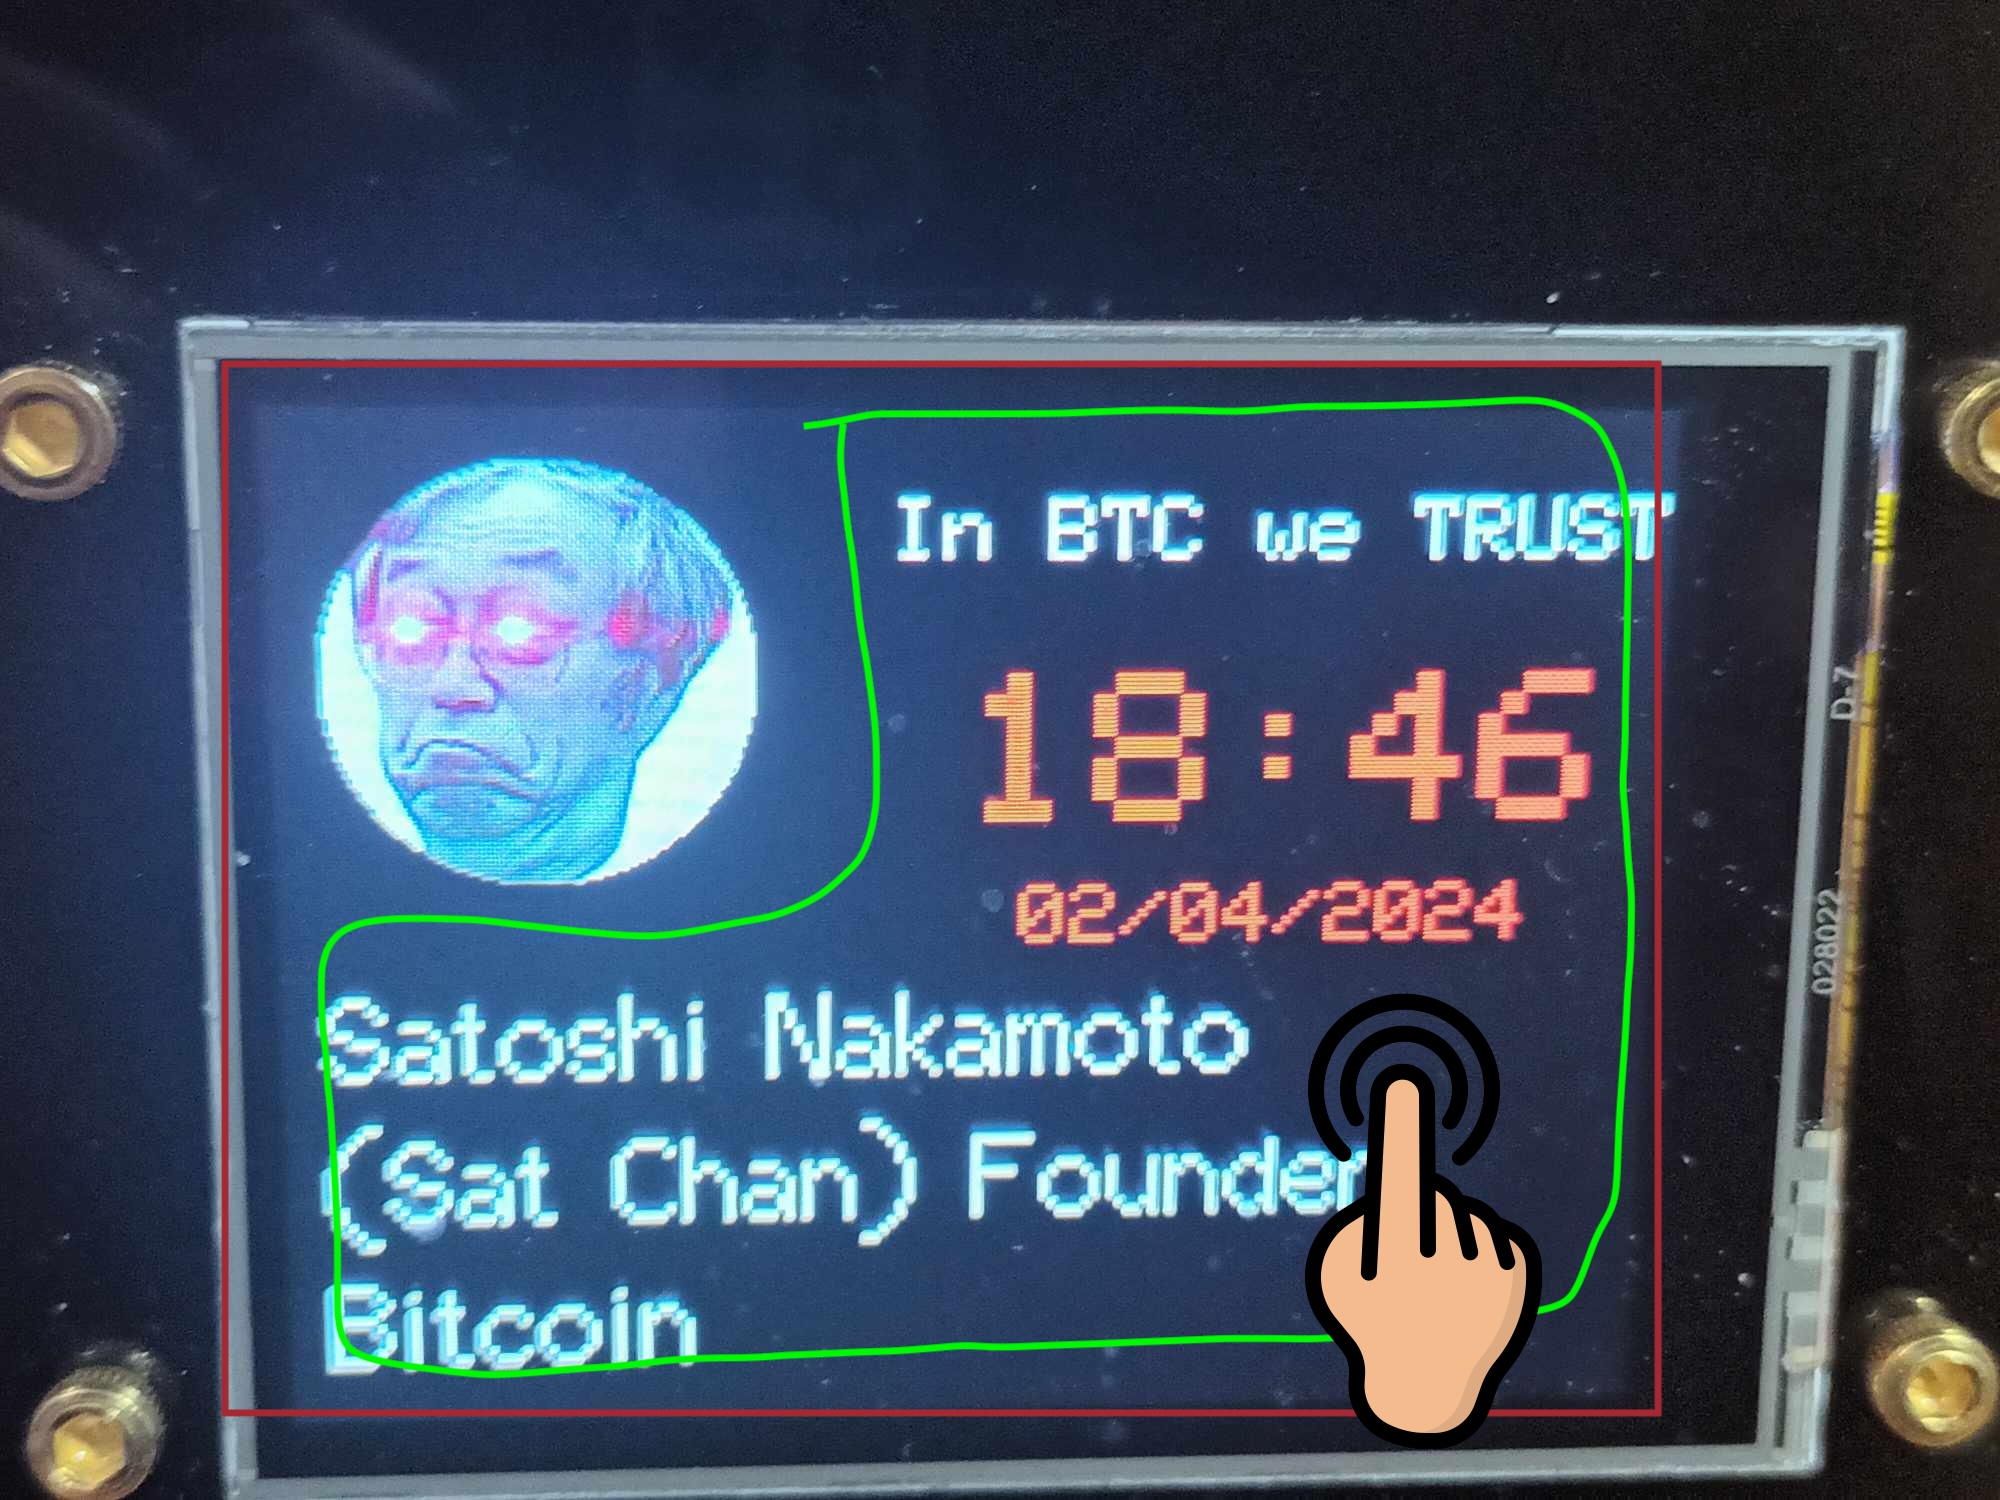
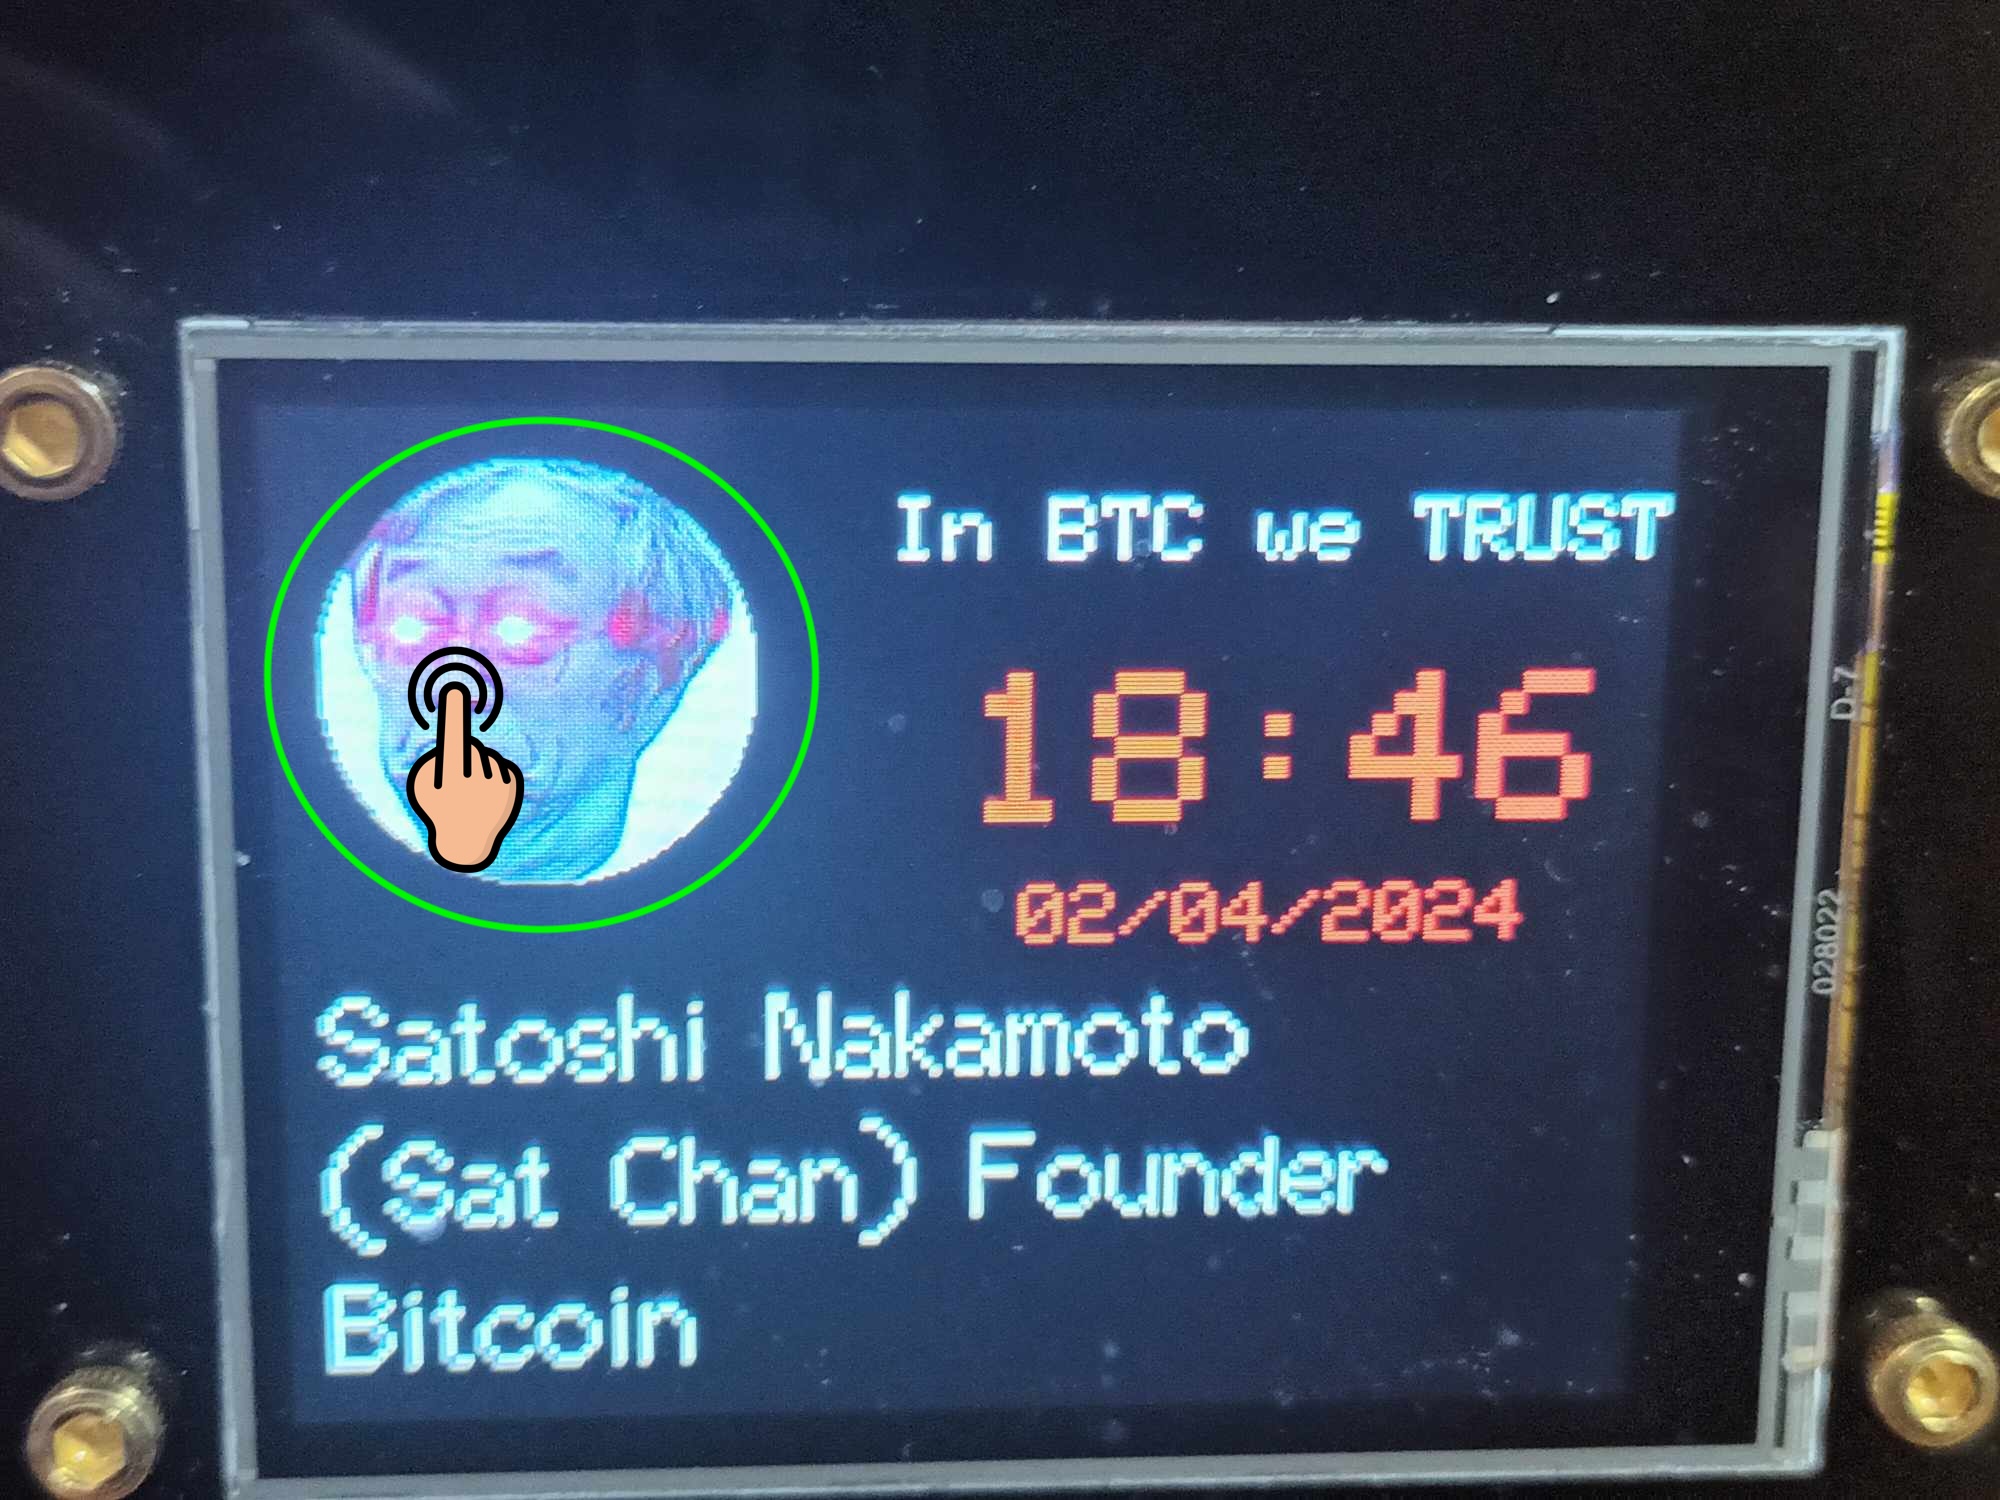
2.1 Personal information, time, and date display

-
2.1.1 Profile picture, users can set their own profile
picture.
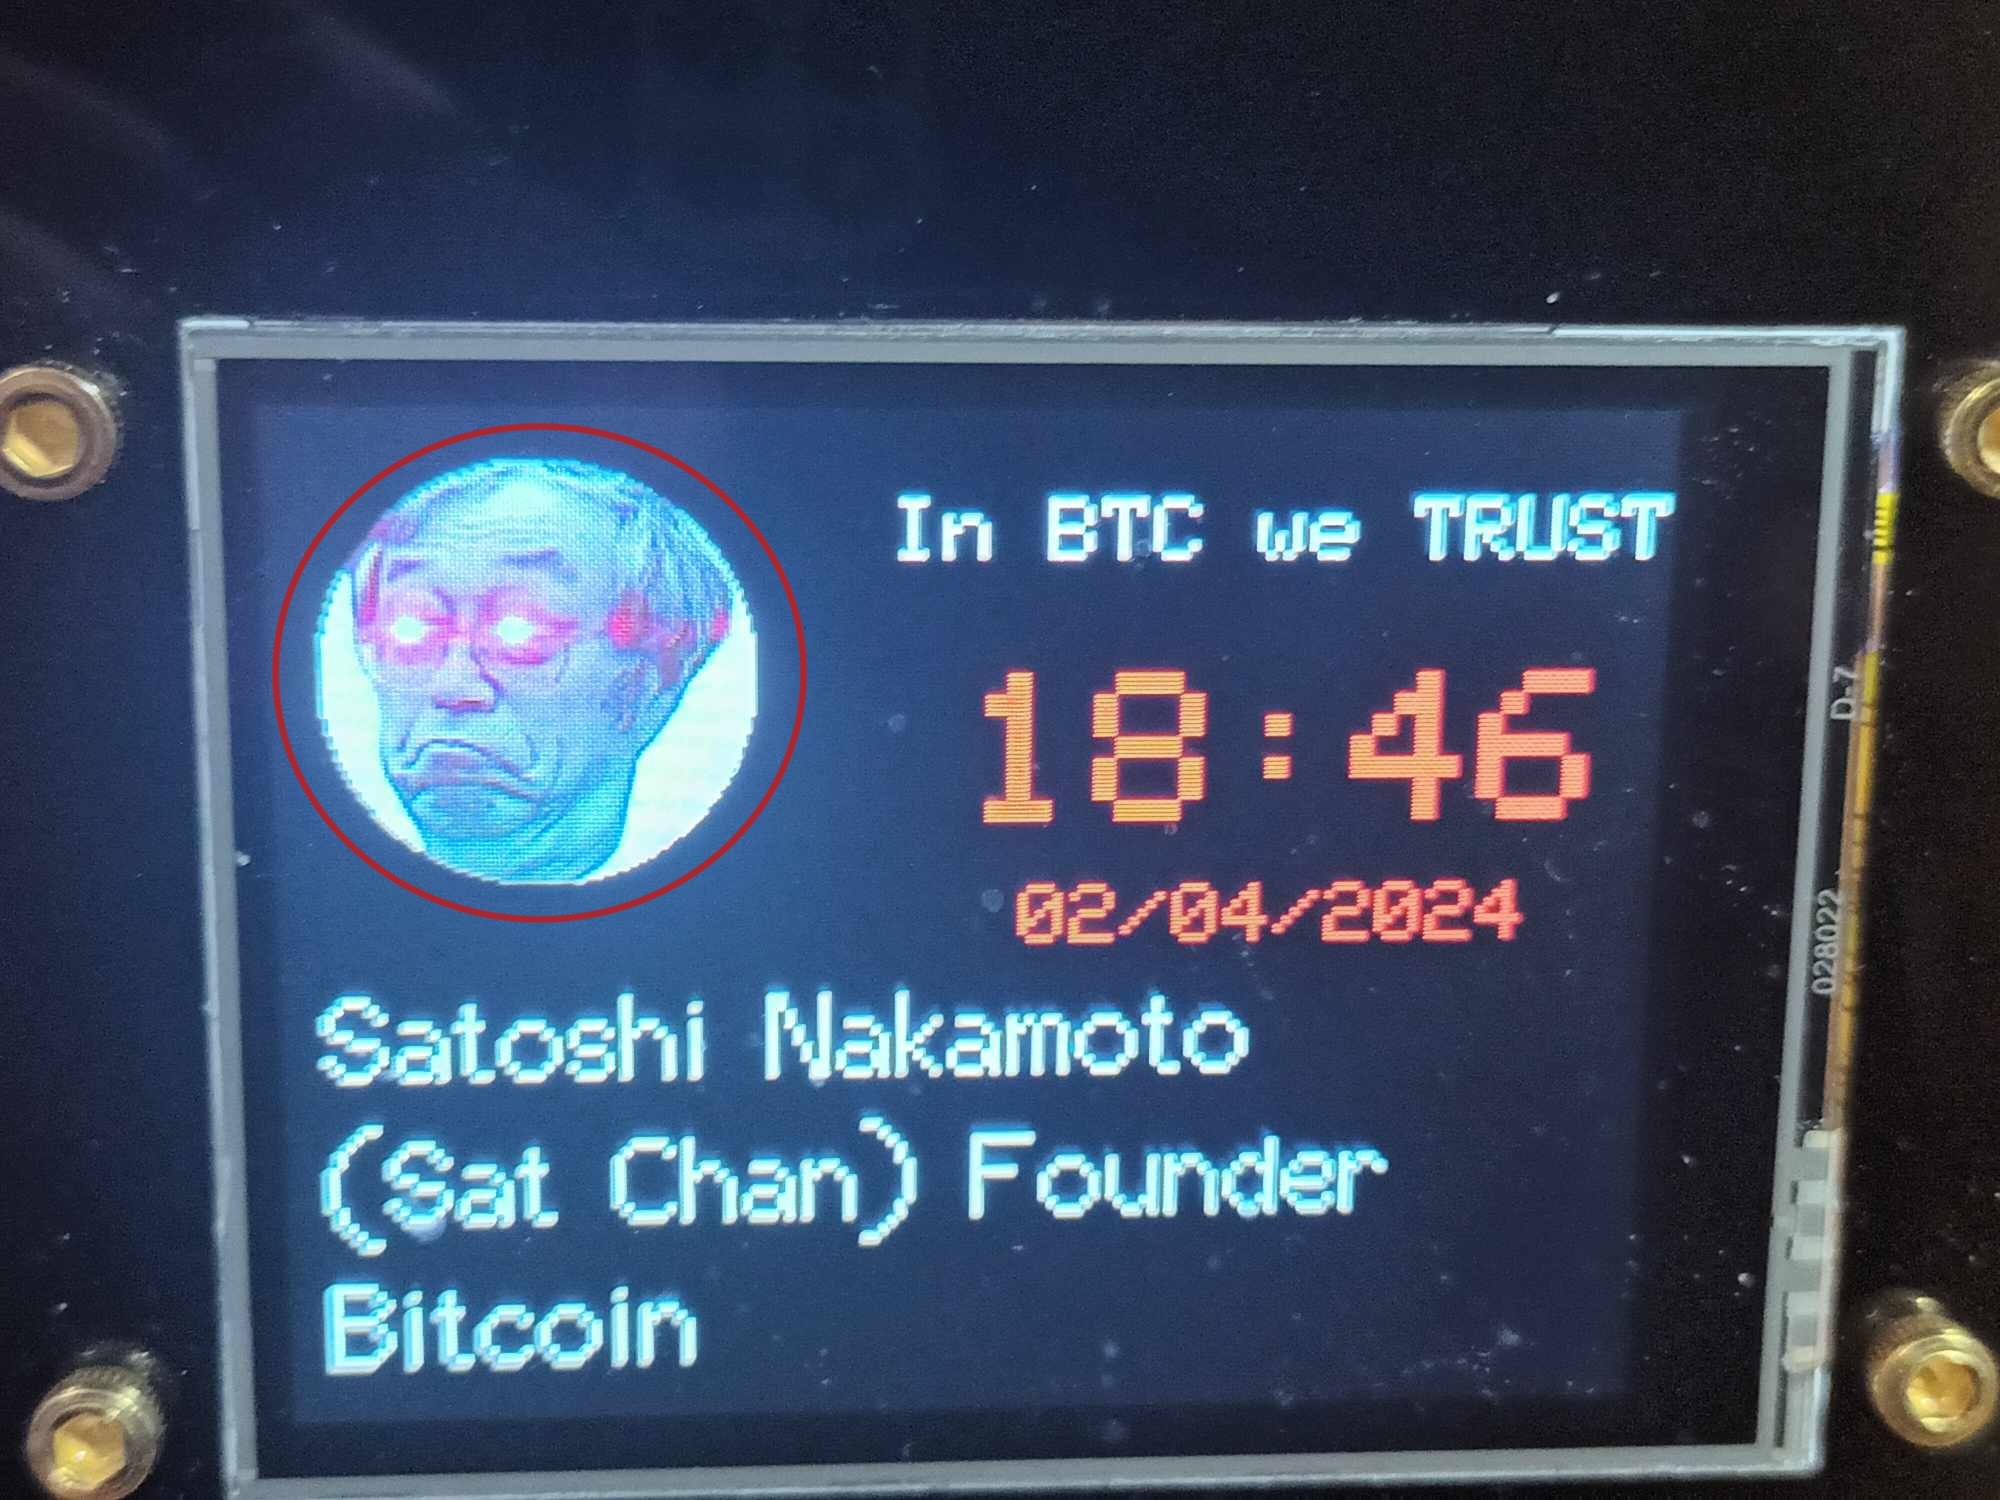
-
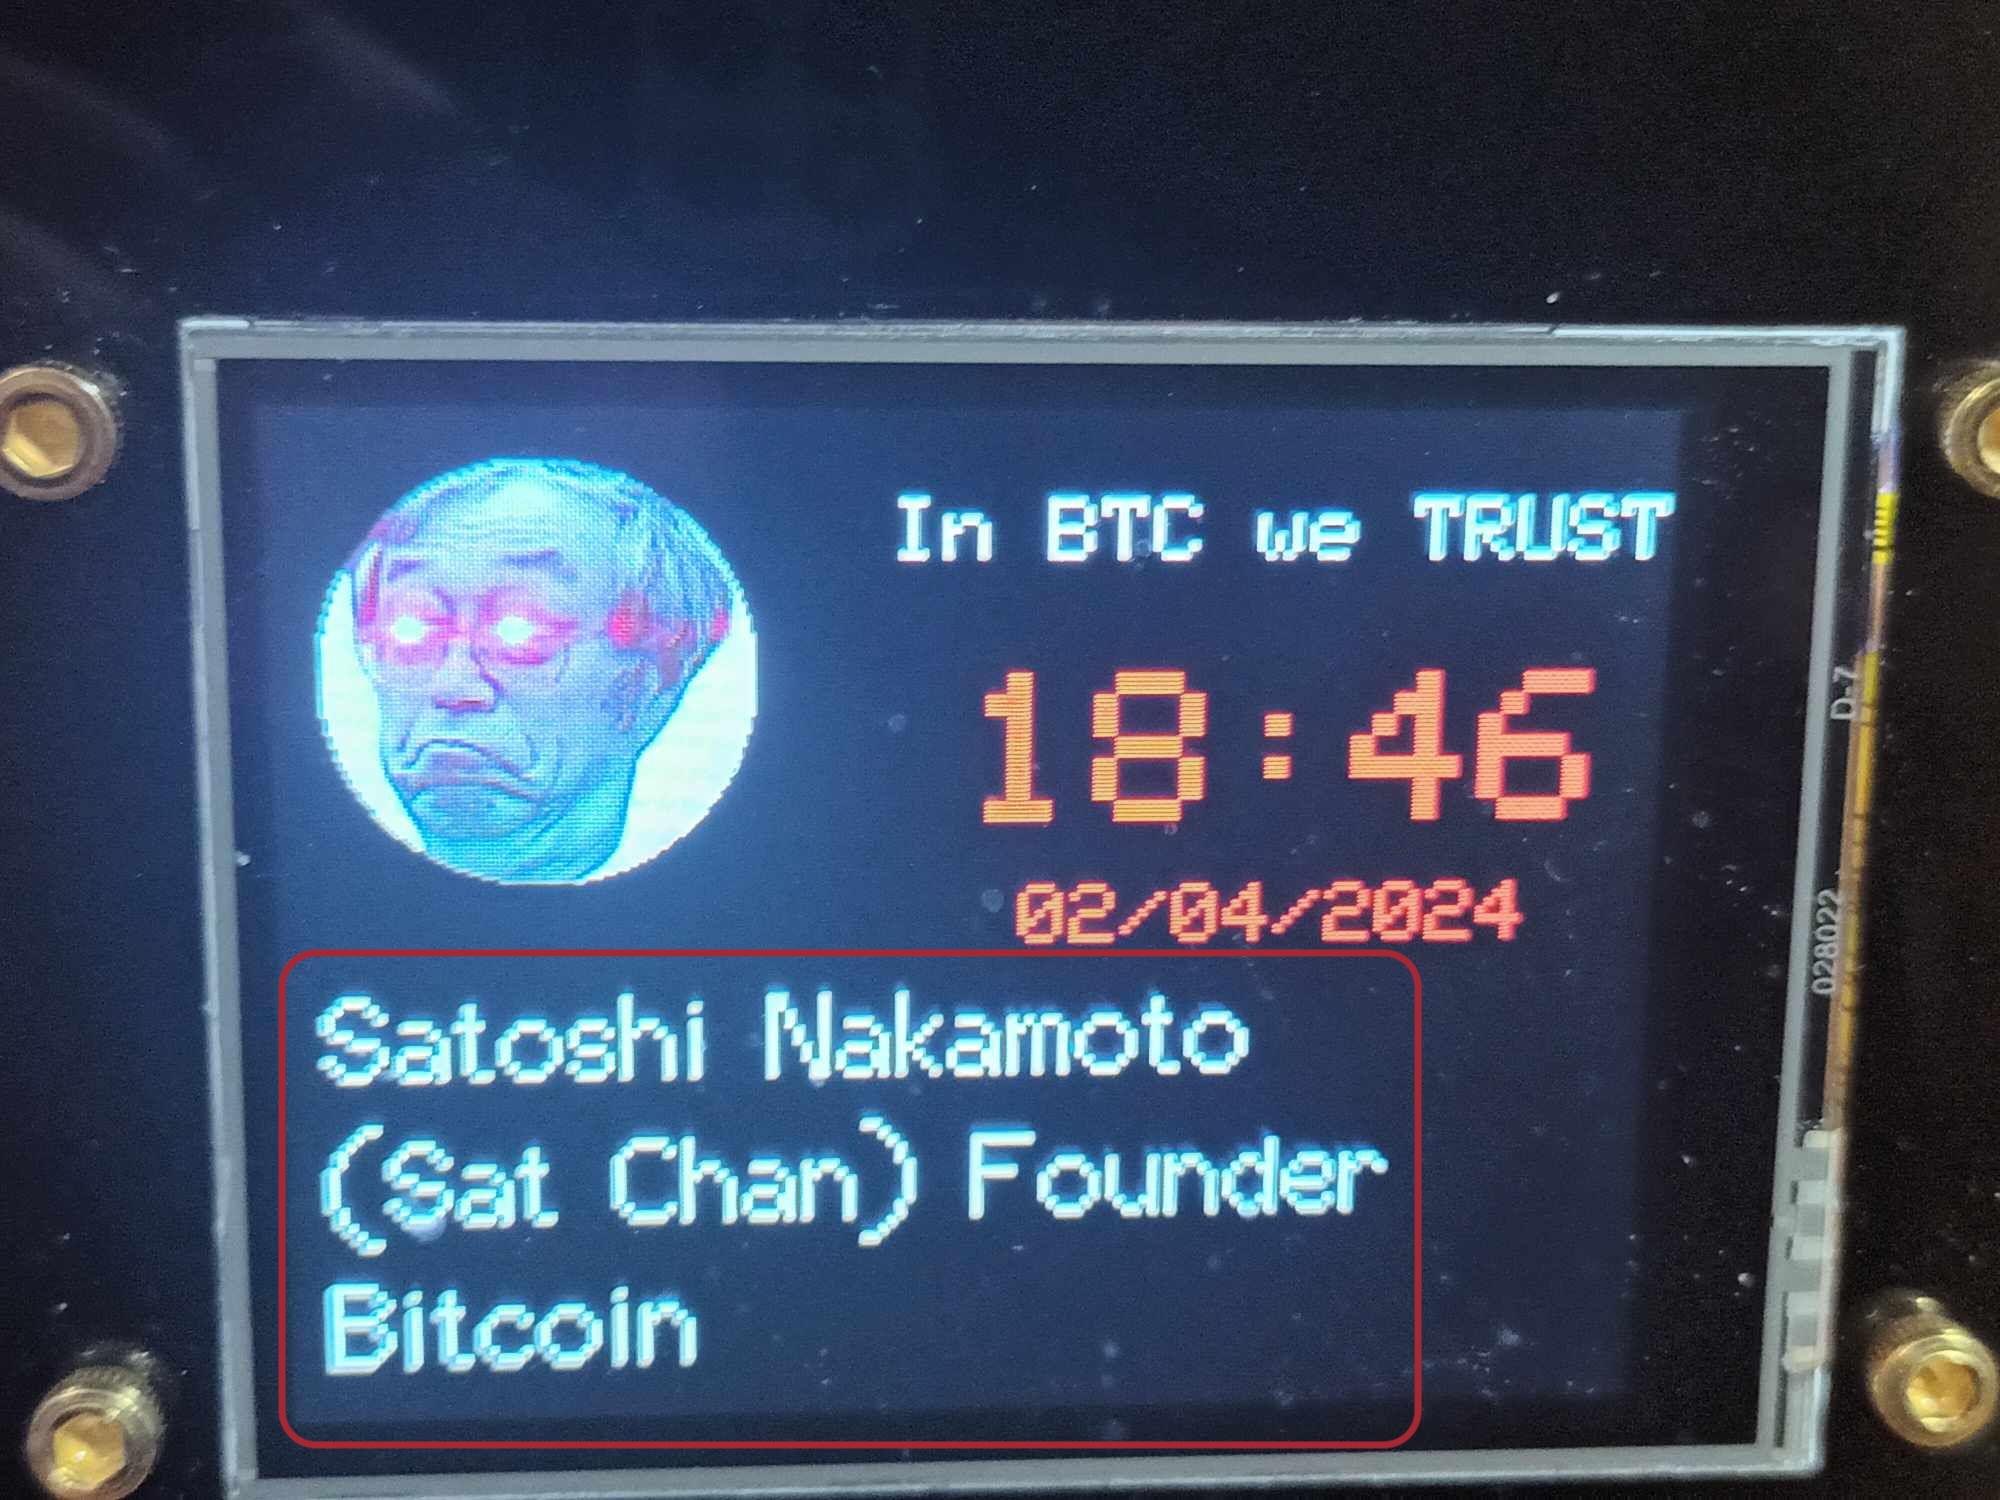
2.1.2 Personal information including real name, surname,
nickname, position, and company, which users can set
themselves.
-
2.1.3 Clock displays time and date automatically, no setup
required, and users can change the display color.
-
2.1.4 Touching any area of the screen other than the profile
picture area switches to the cryptocurrency coin display.
-
2.1.1 Profile picture, users can set their own profile
picture.
-
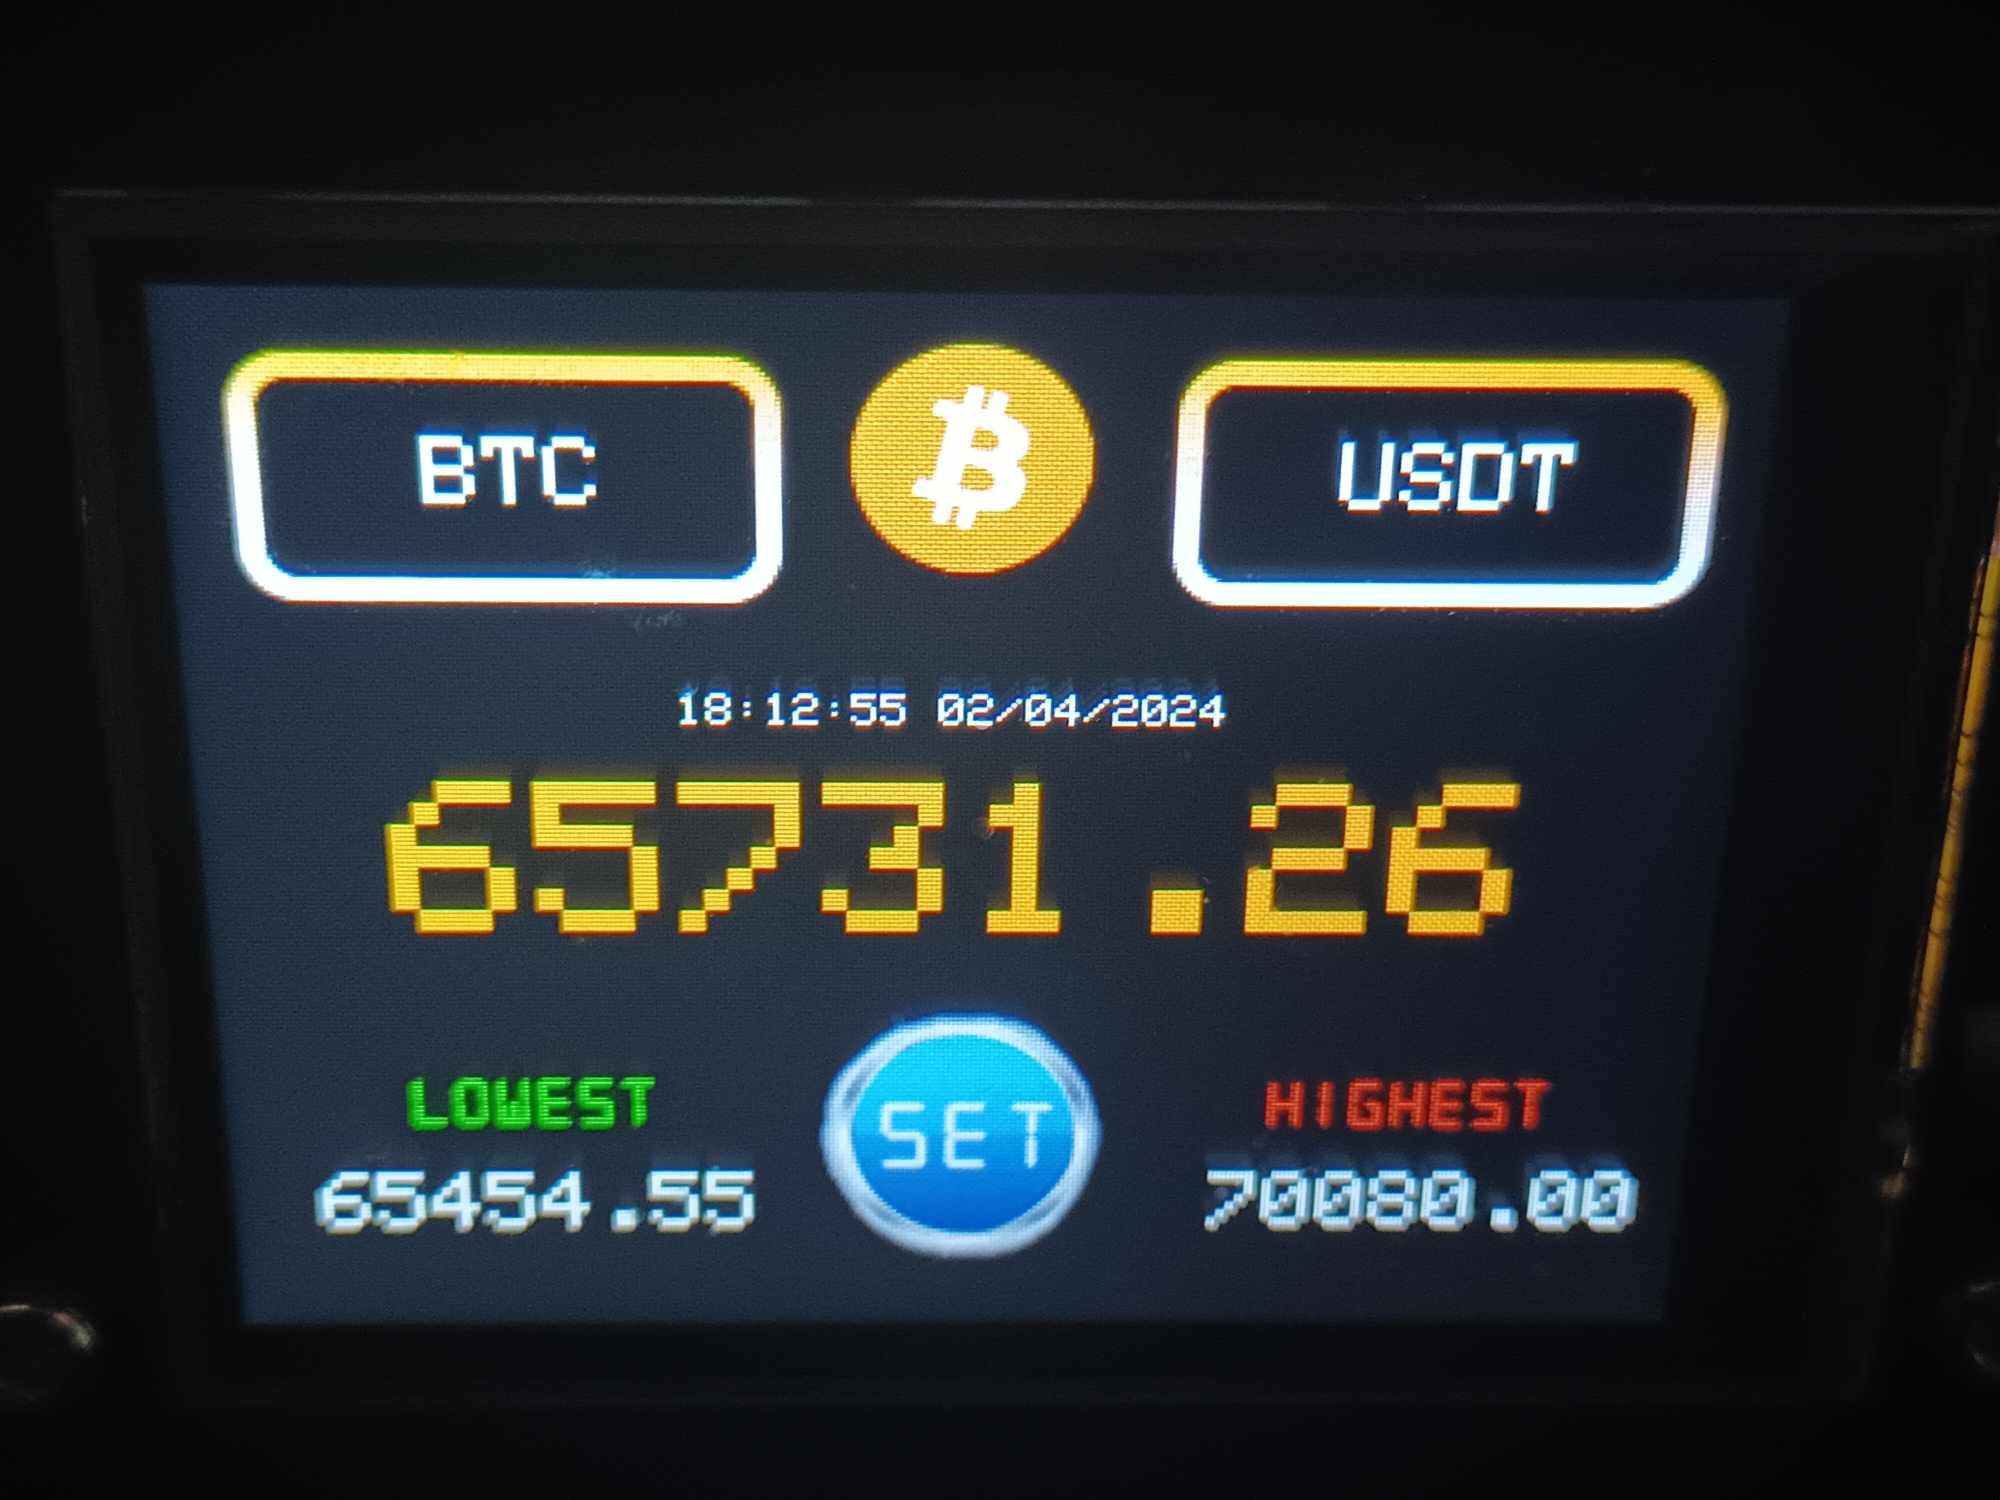
2.2 Cryptocurrency coin and desired information display

-
2.2.1 Coins of interest, pressing this allows switching to
another coin; typically, two coins can be toggled between in
the standard version.
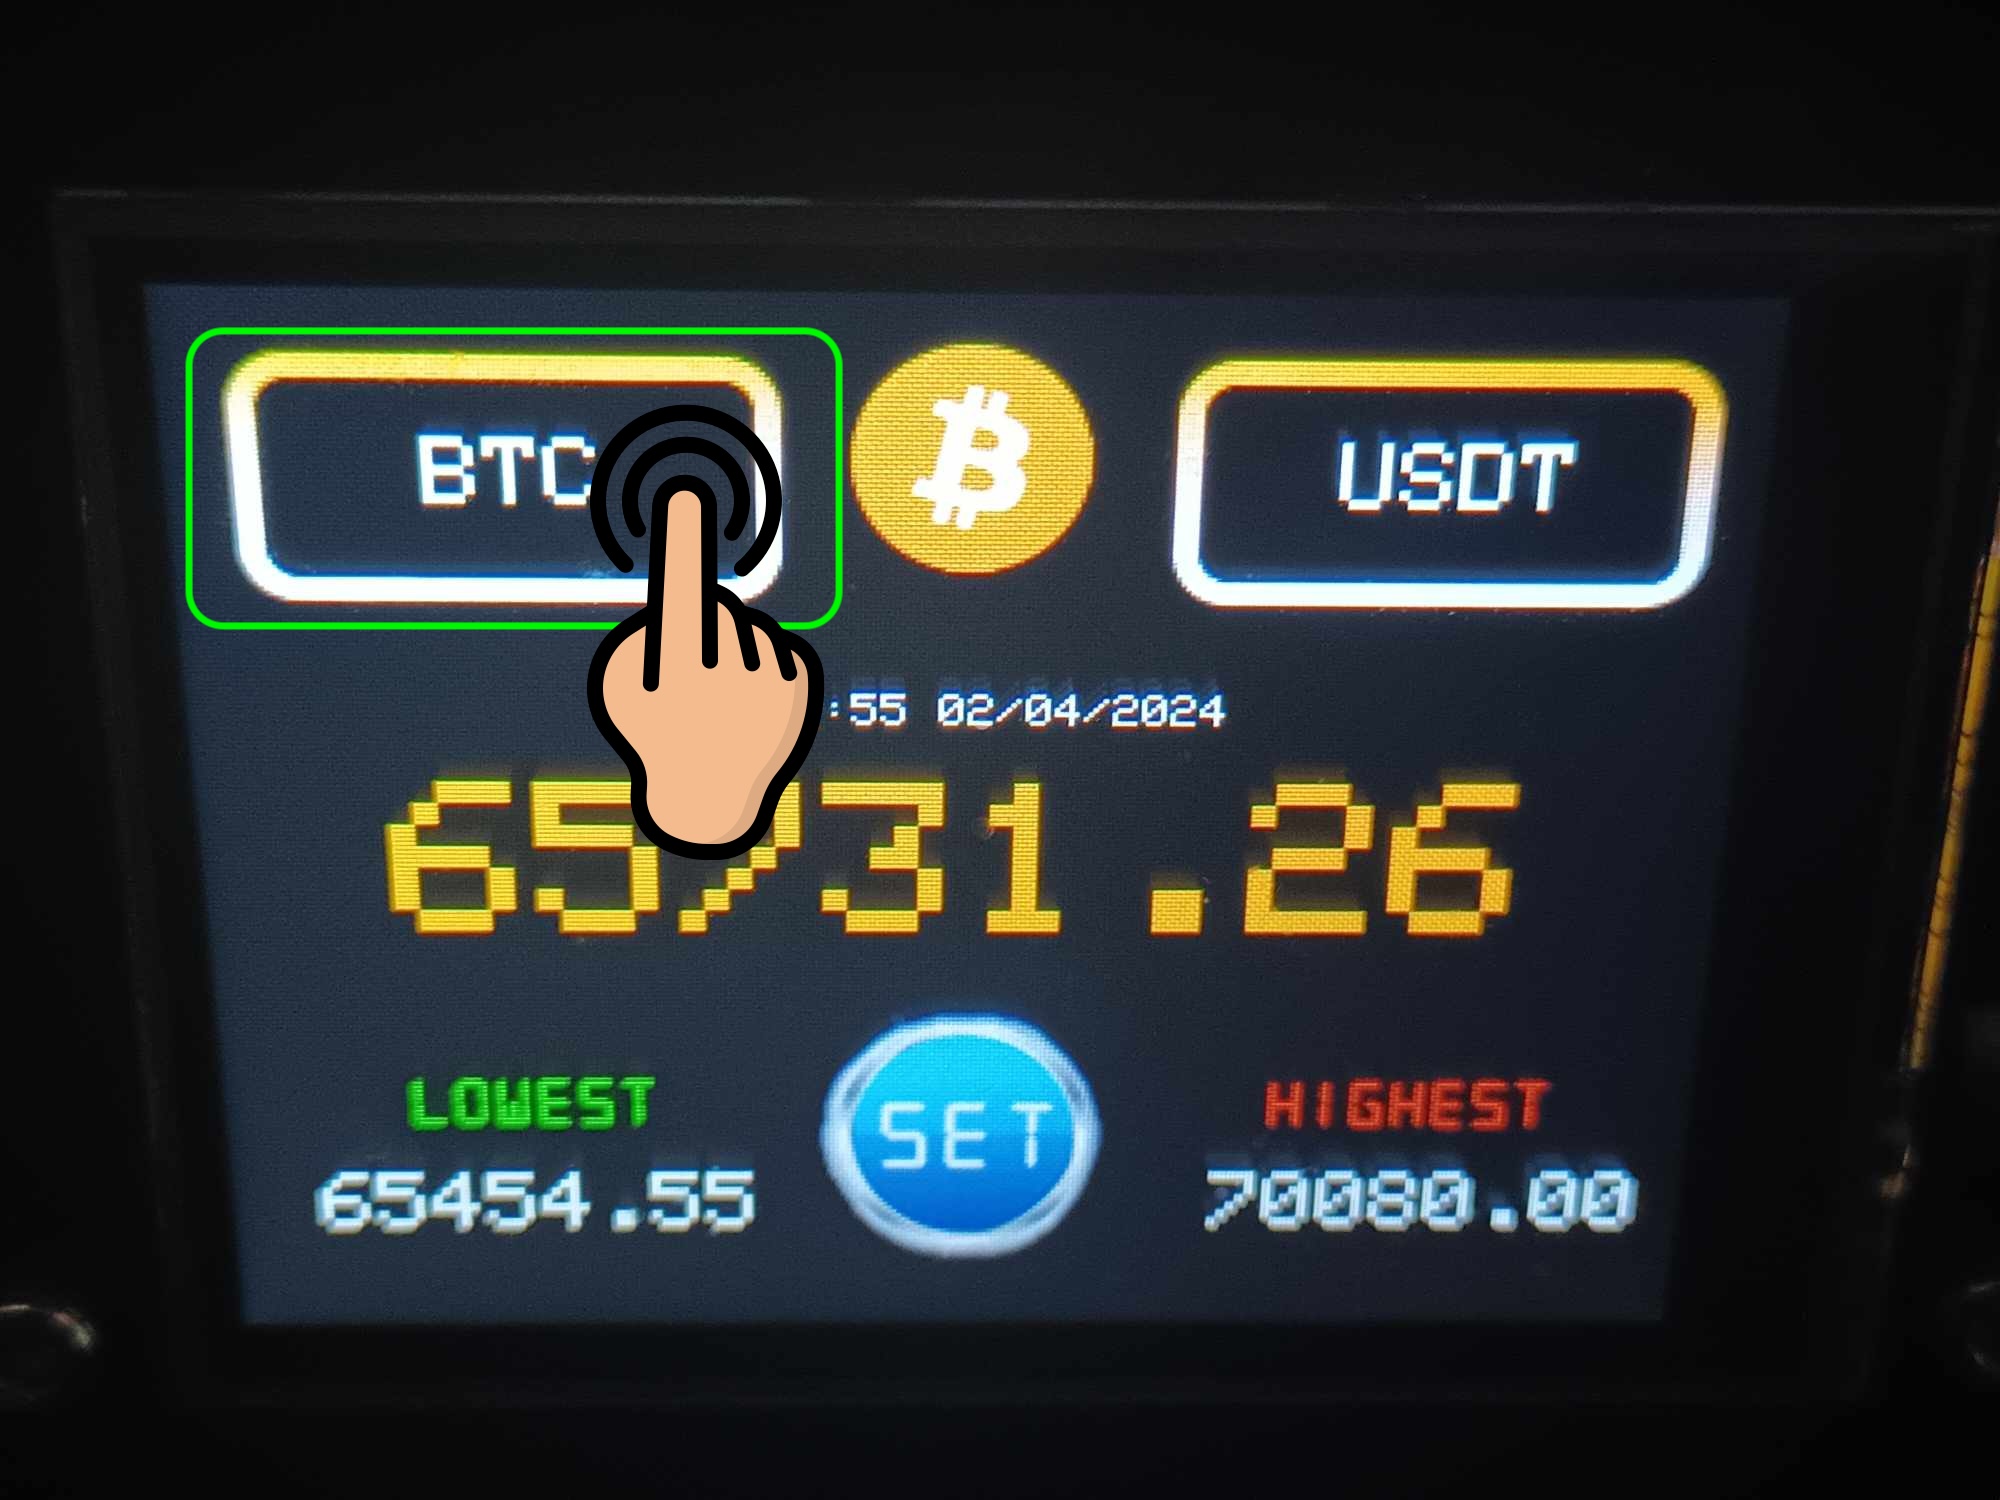
-
2.2.2 Comparison currency, in the standard version purchased
in Thailand, two currencies, THB and USDT, are available,
pressing this toggles between them.
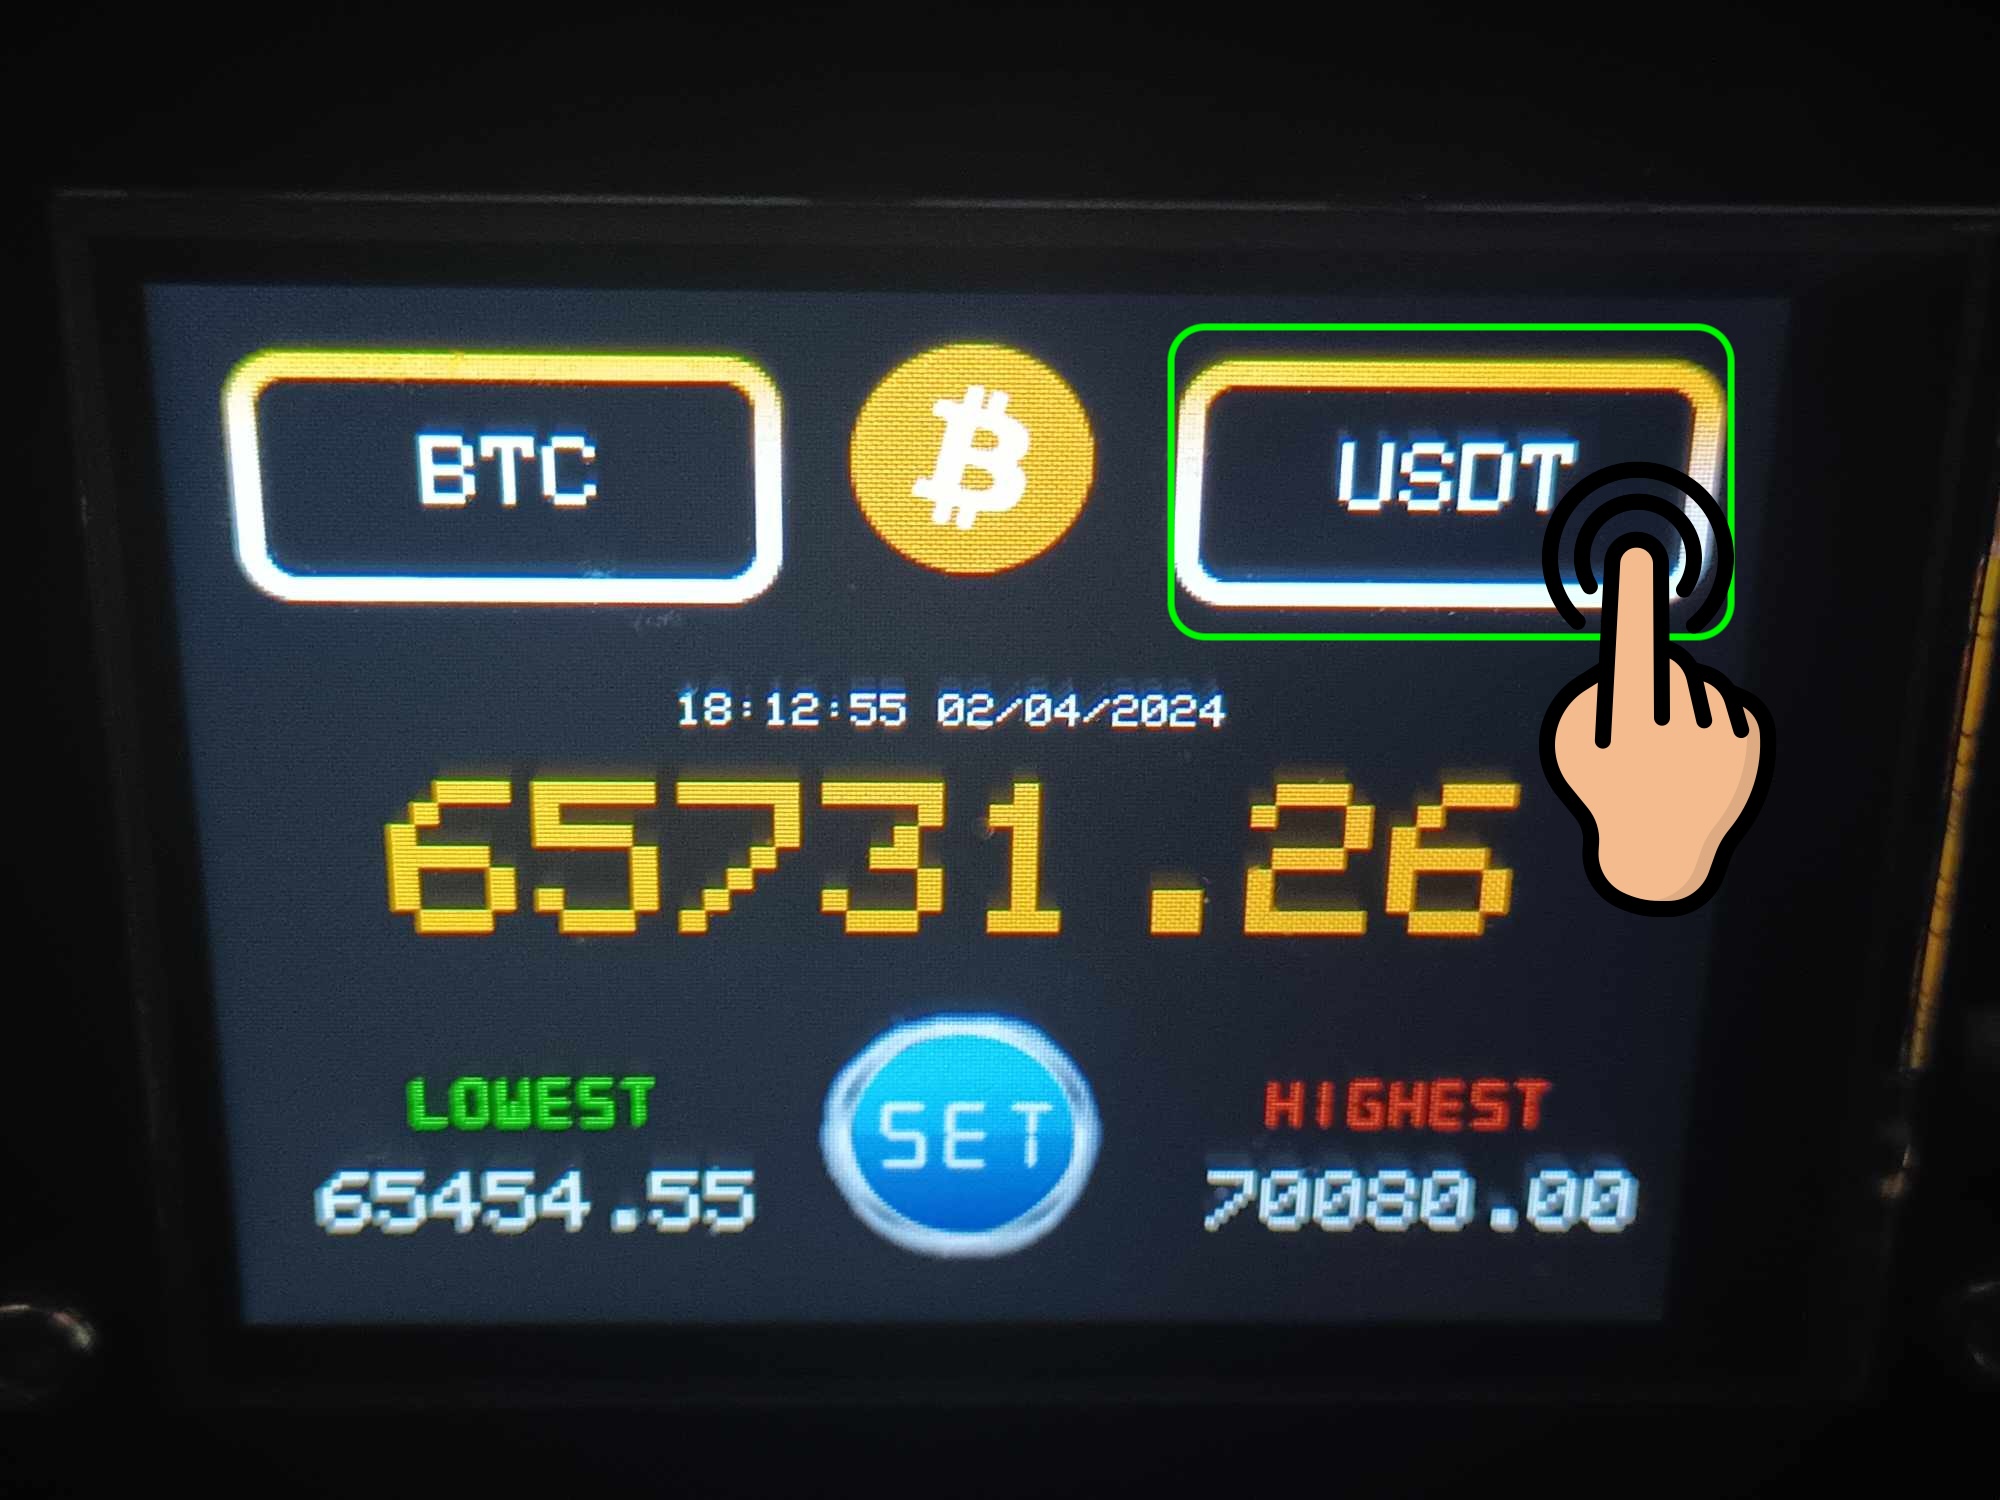
-
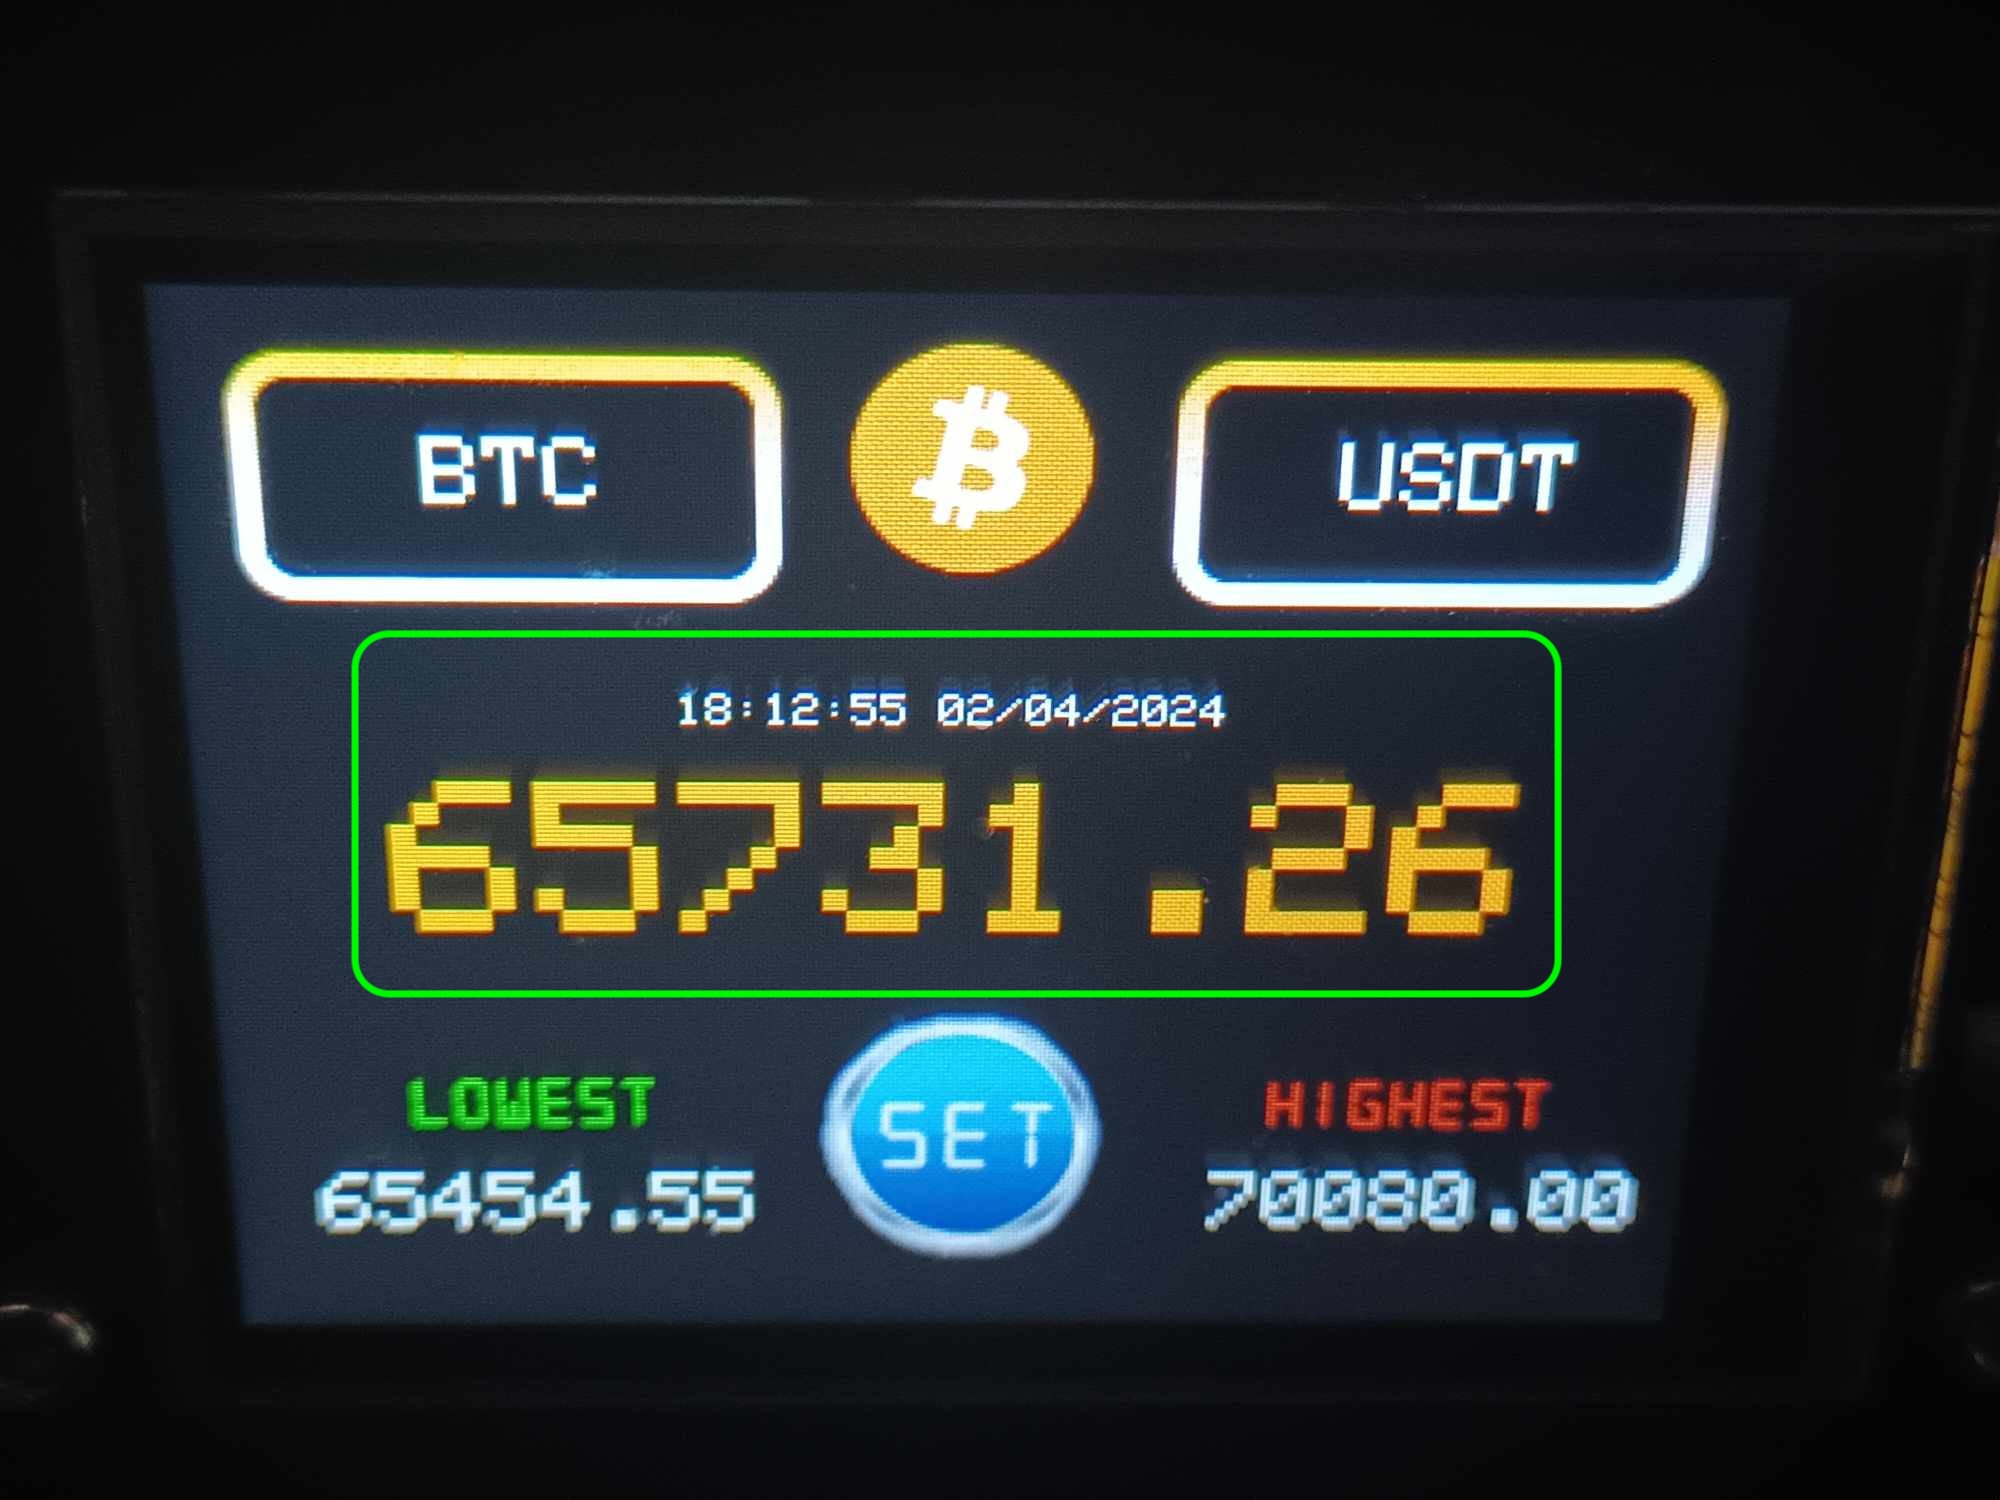
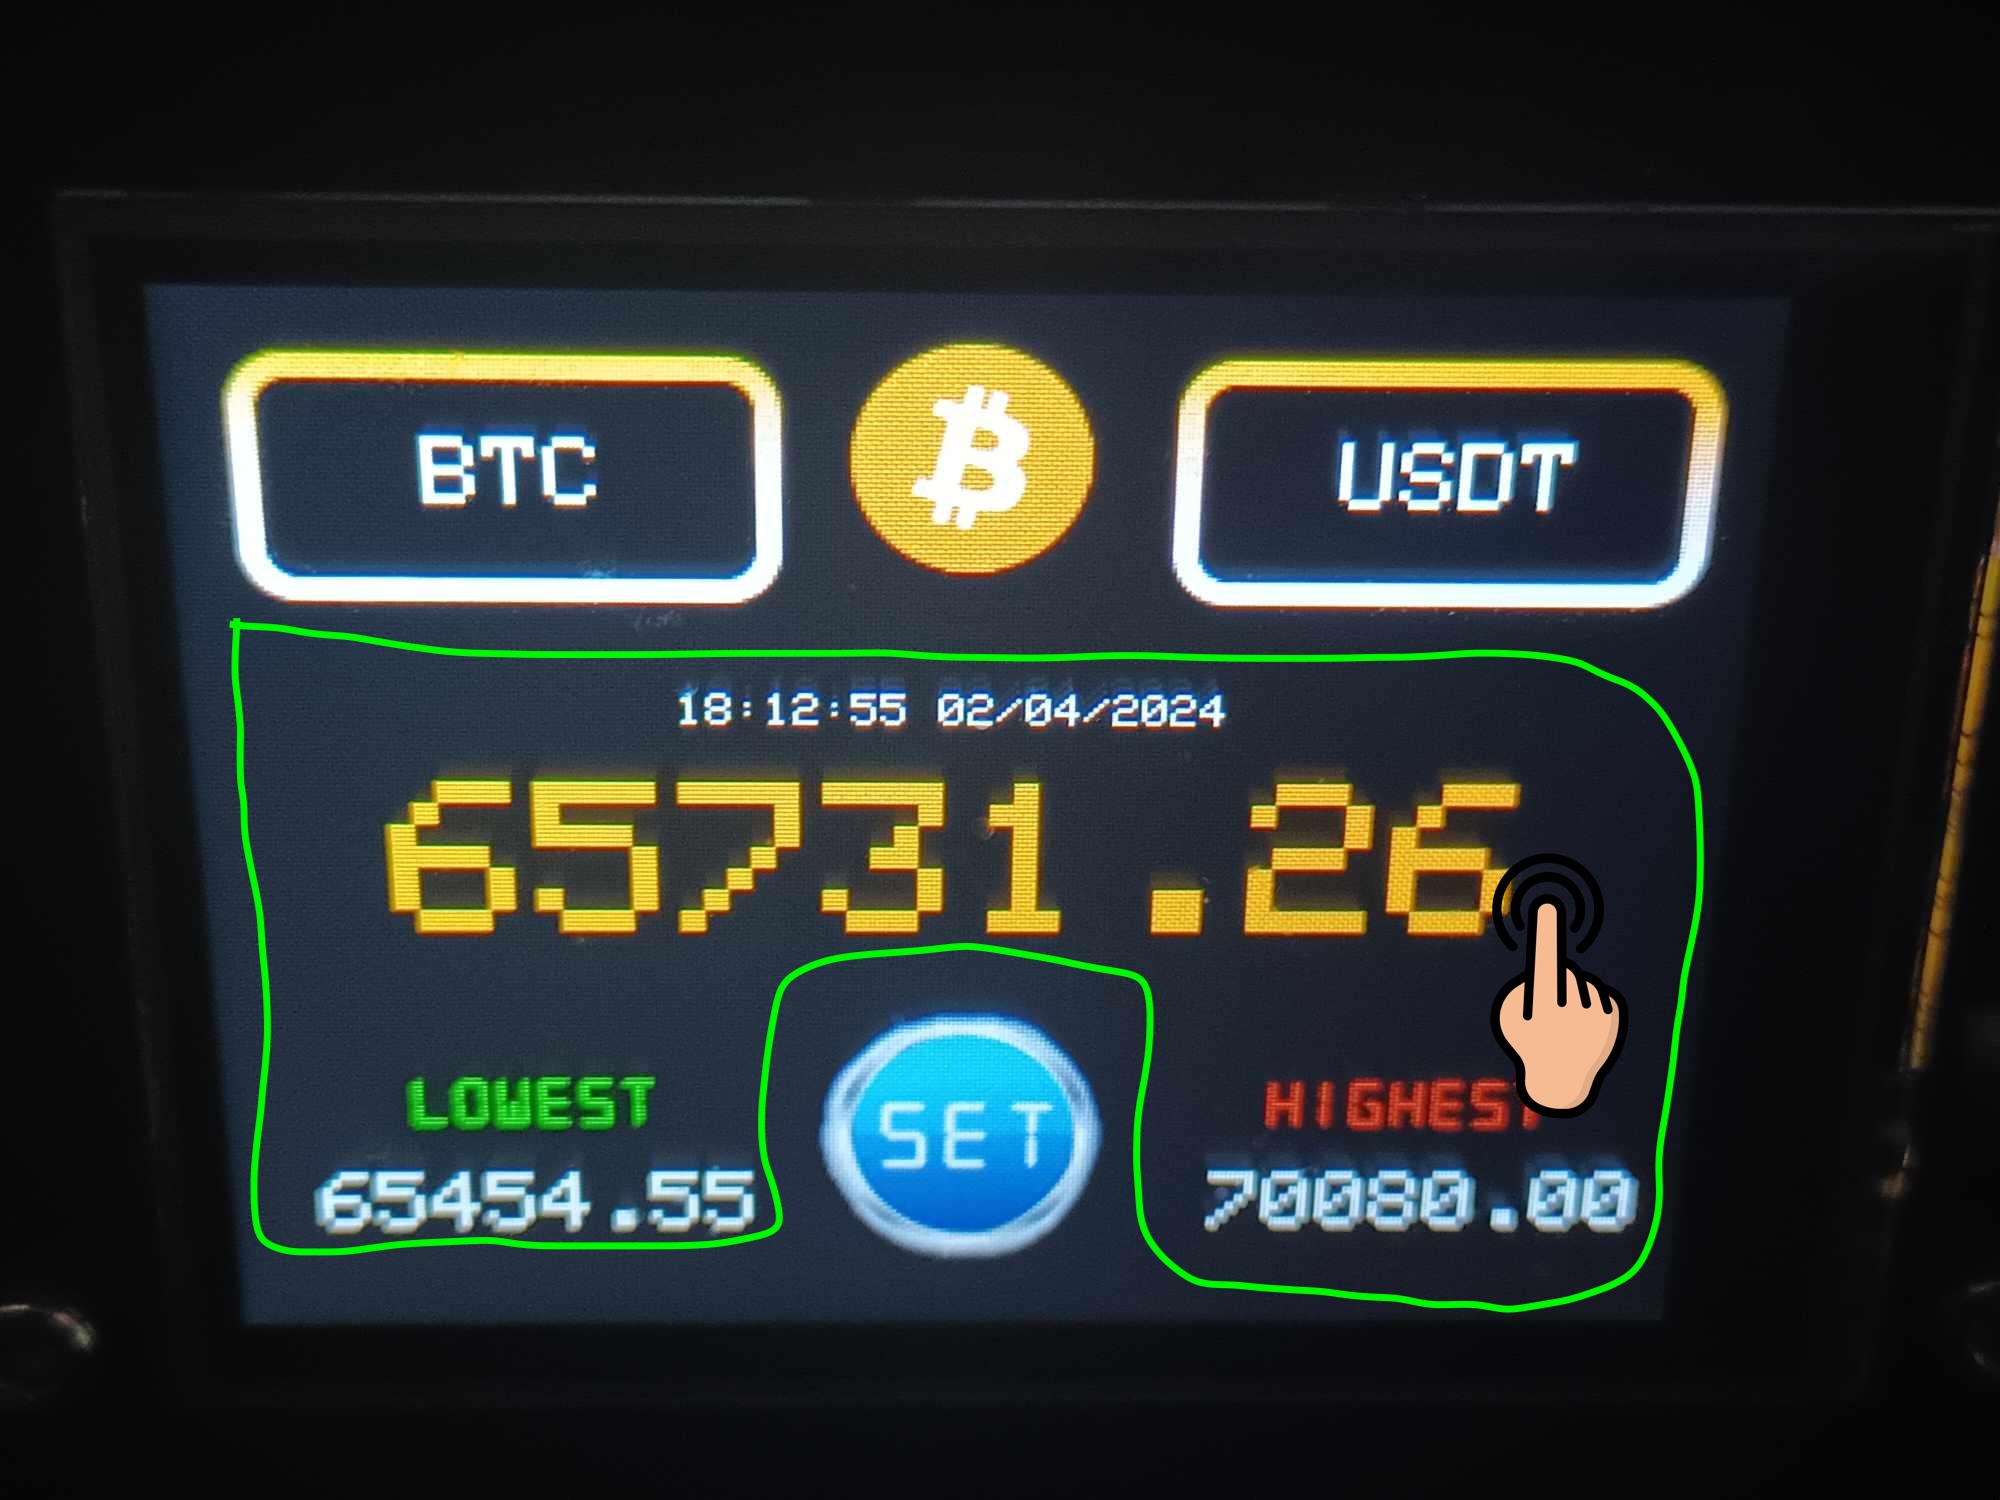
2.2.3 Real-time coin price along with date and time, with
the option to adjust update frequency in settings.
-
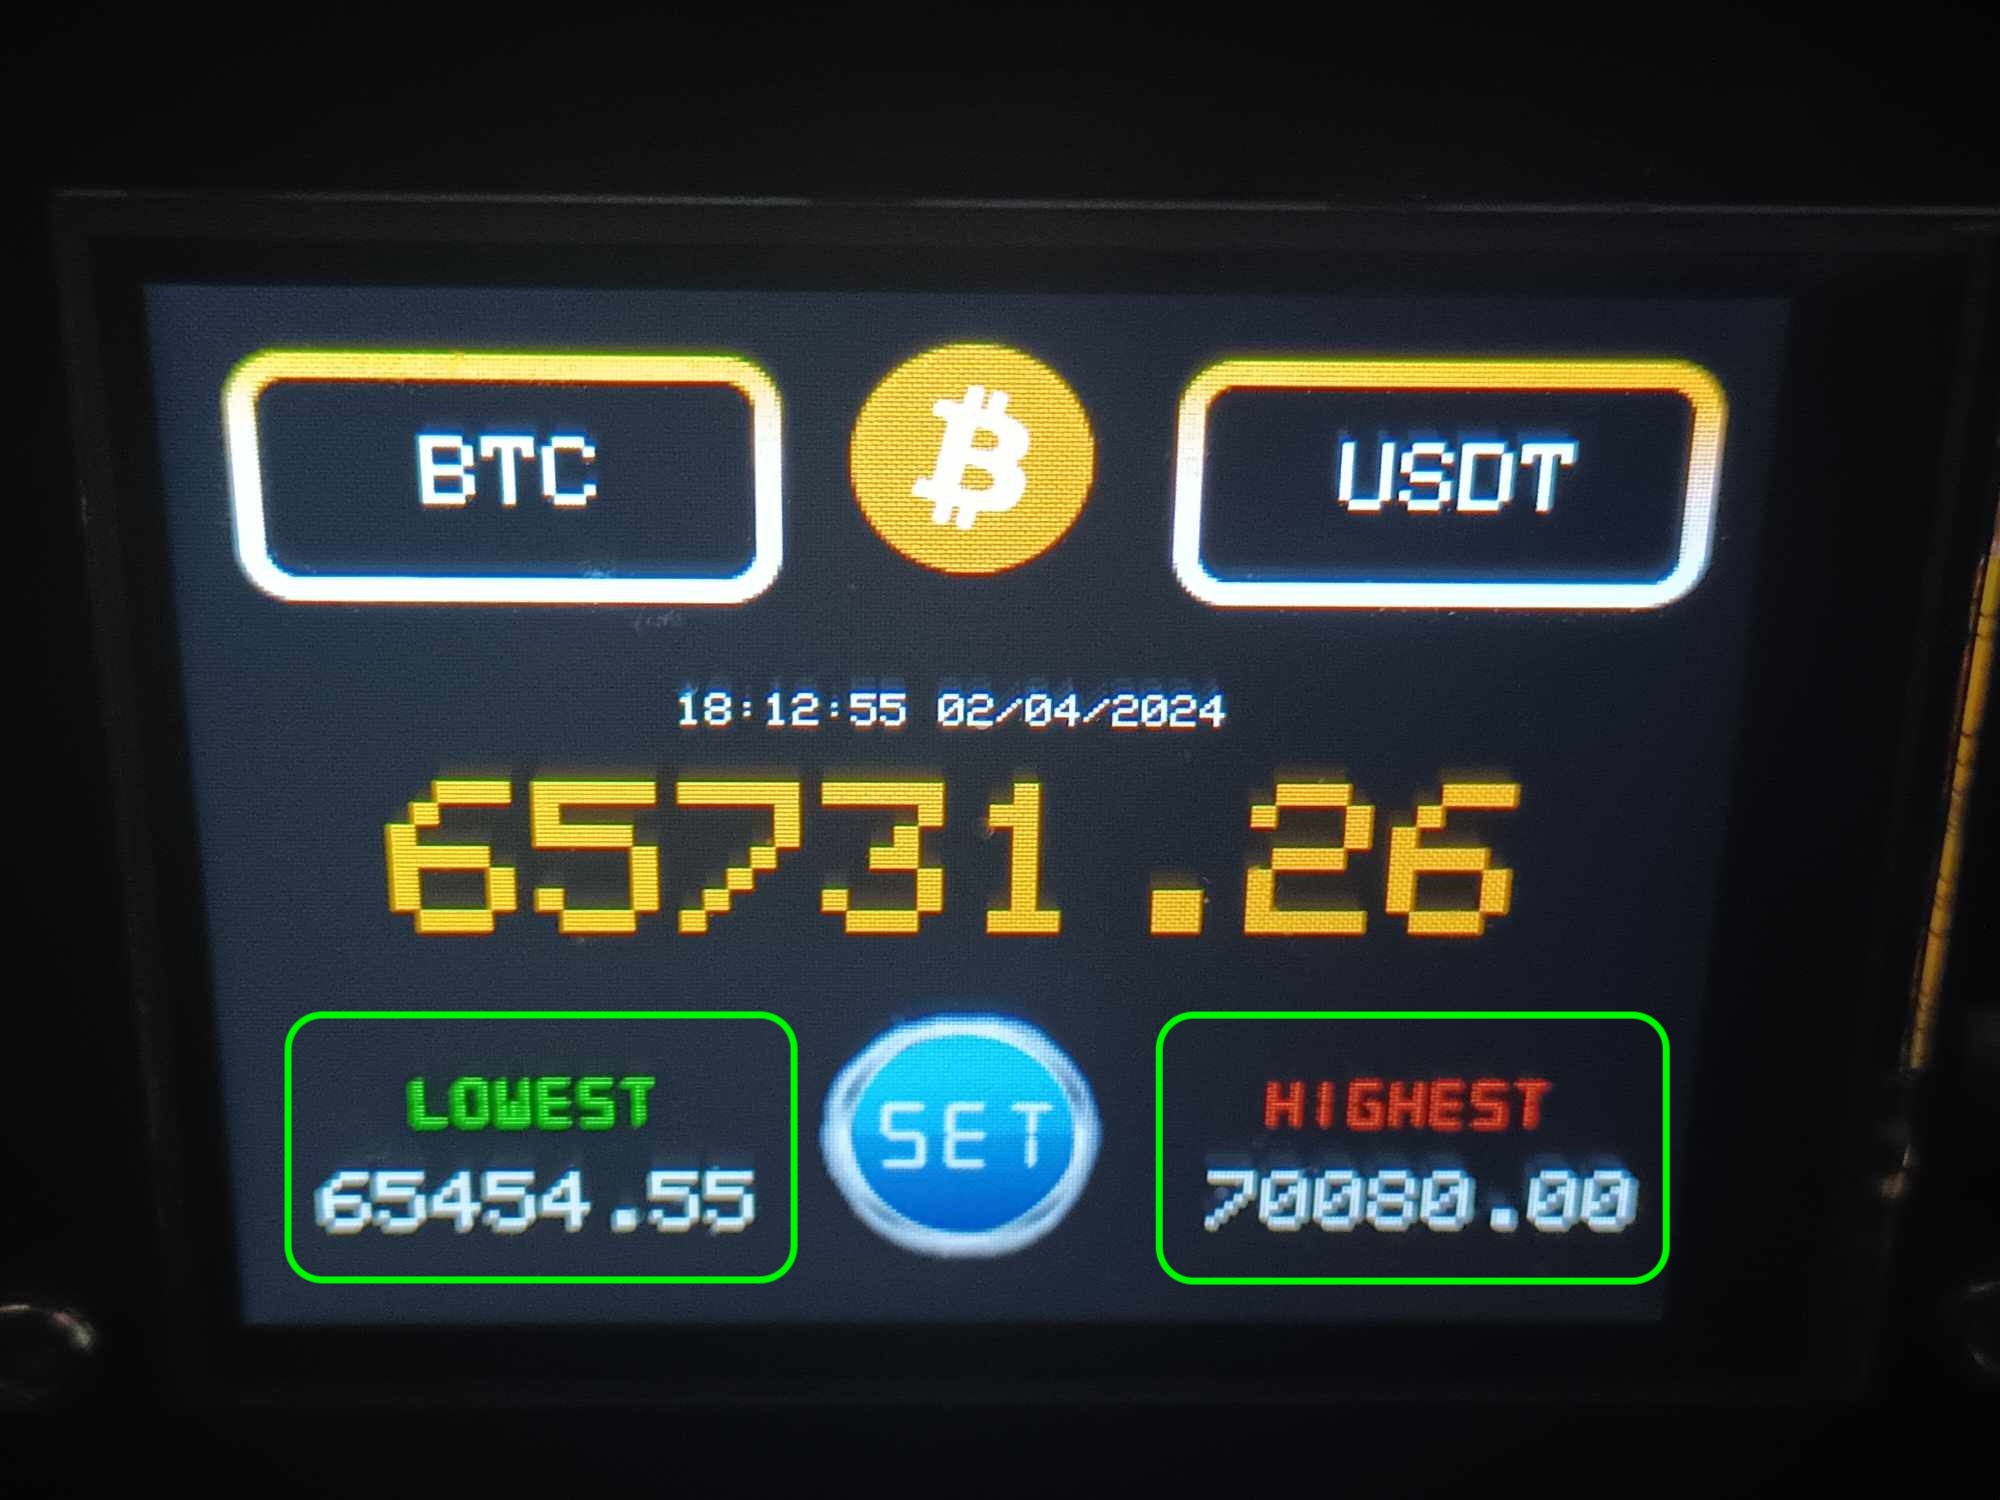
2.2.4 Lowest and highest price in the last 24 hours.
-
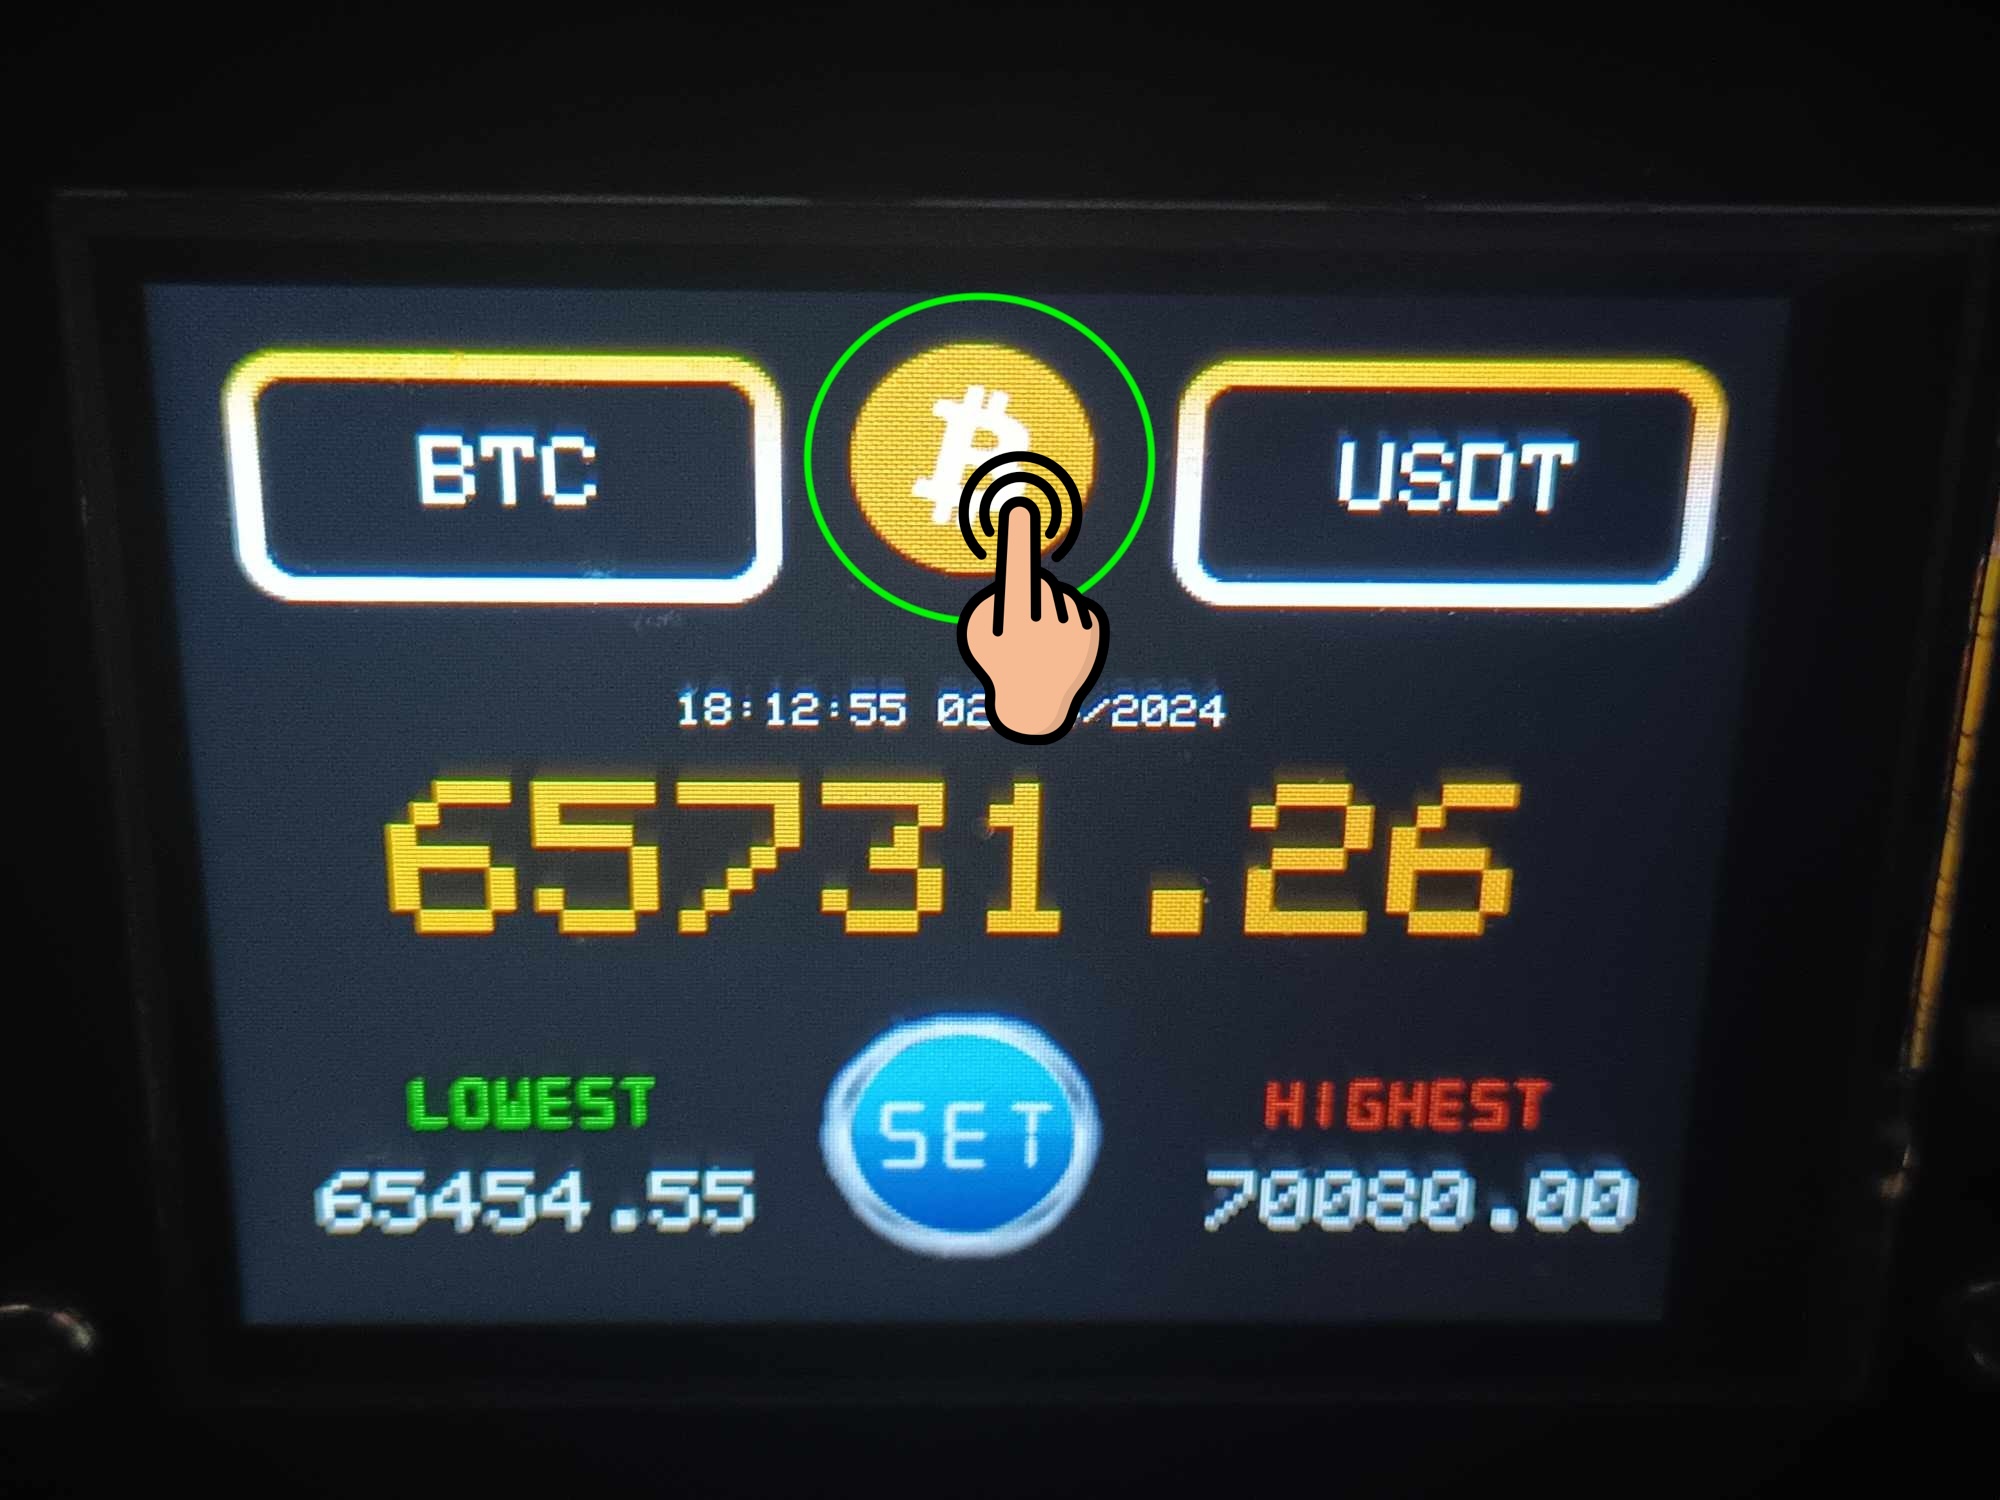
2.2.5 Coin logo of interest, pressing it allows setting the
coins of interest through scanning a QR Code.

-
2.2.6 The Set button, pressing it goes to the internal
settings page.

-
2.2.7 Touching any other area outside of the coin, currency,
logo, and Set button switches to the personal information
and clock display.
-
2.2.1 Coins of interest, pressing this allows switching to
another coin; typically, two coins can be toggled between in
the standard version.
-
2.3 Internal settings display

-
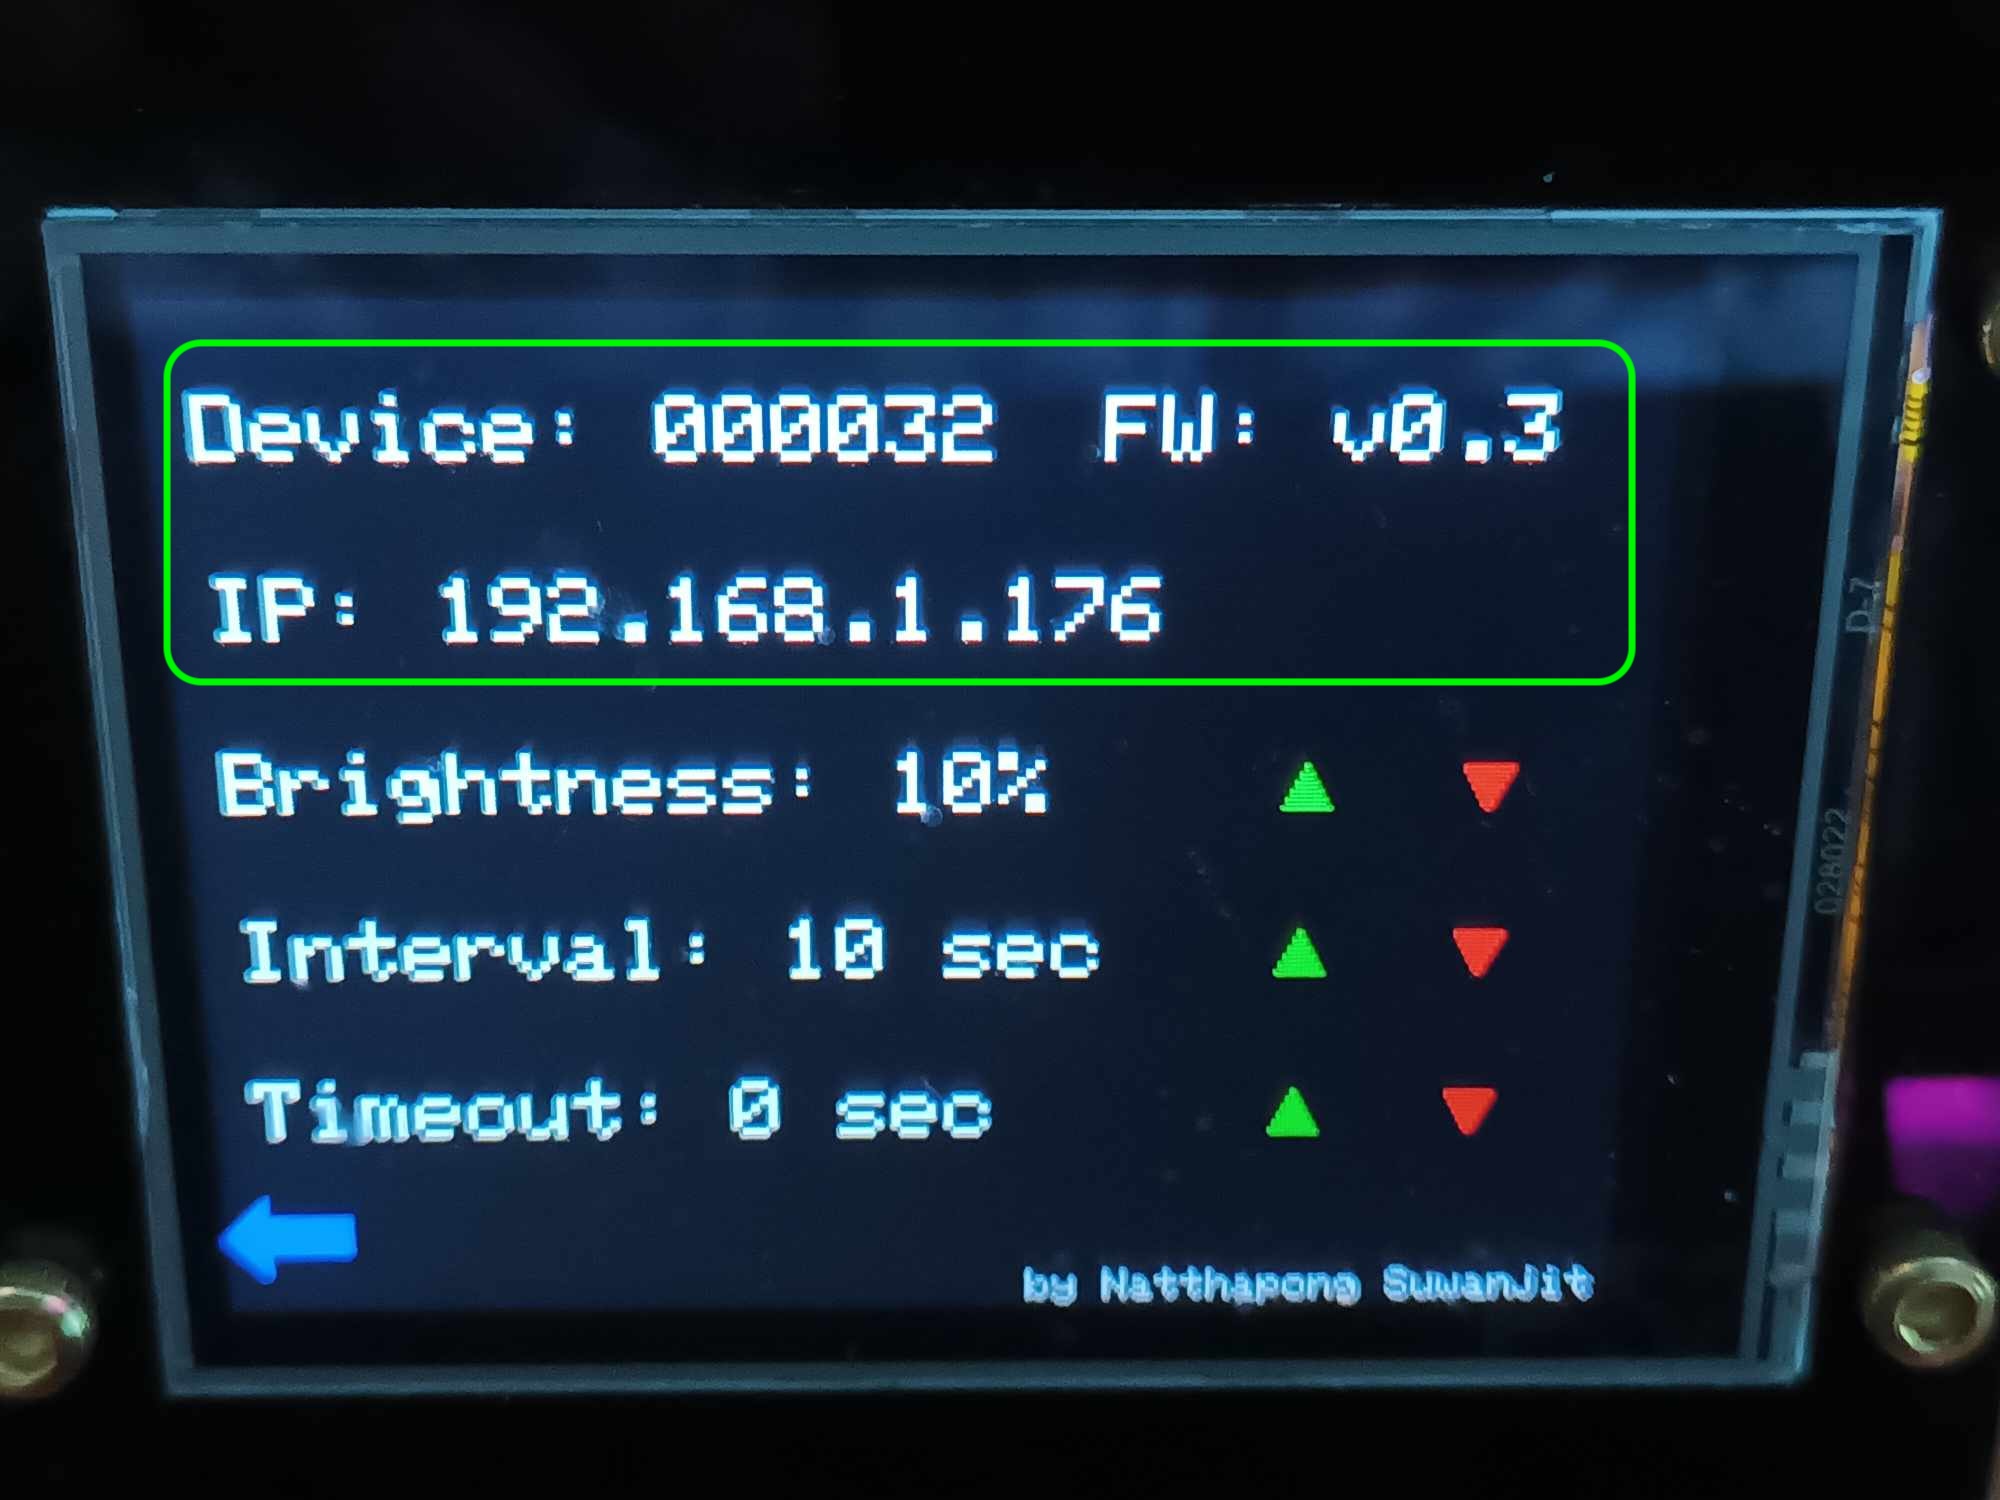
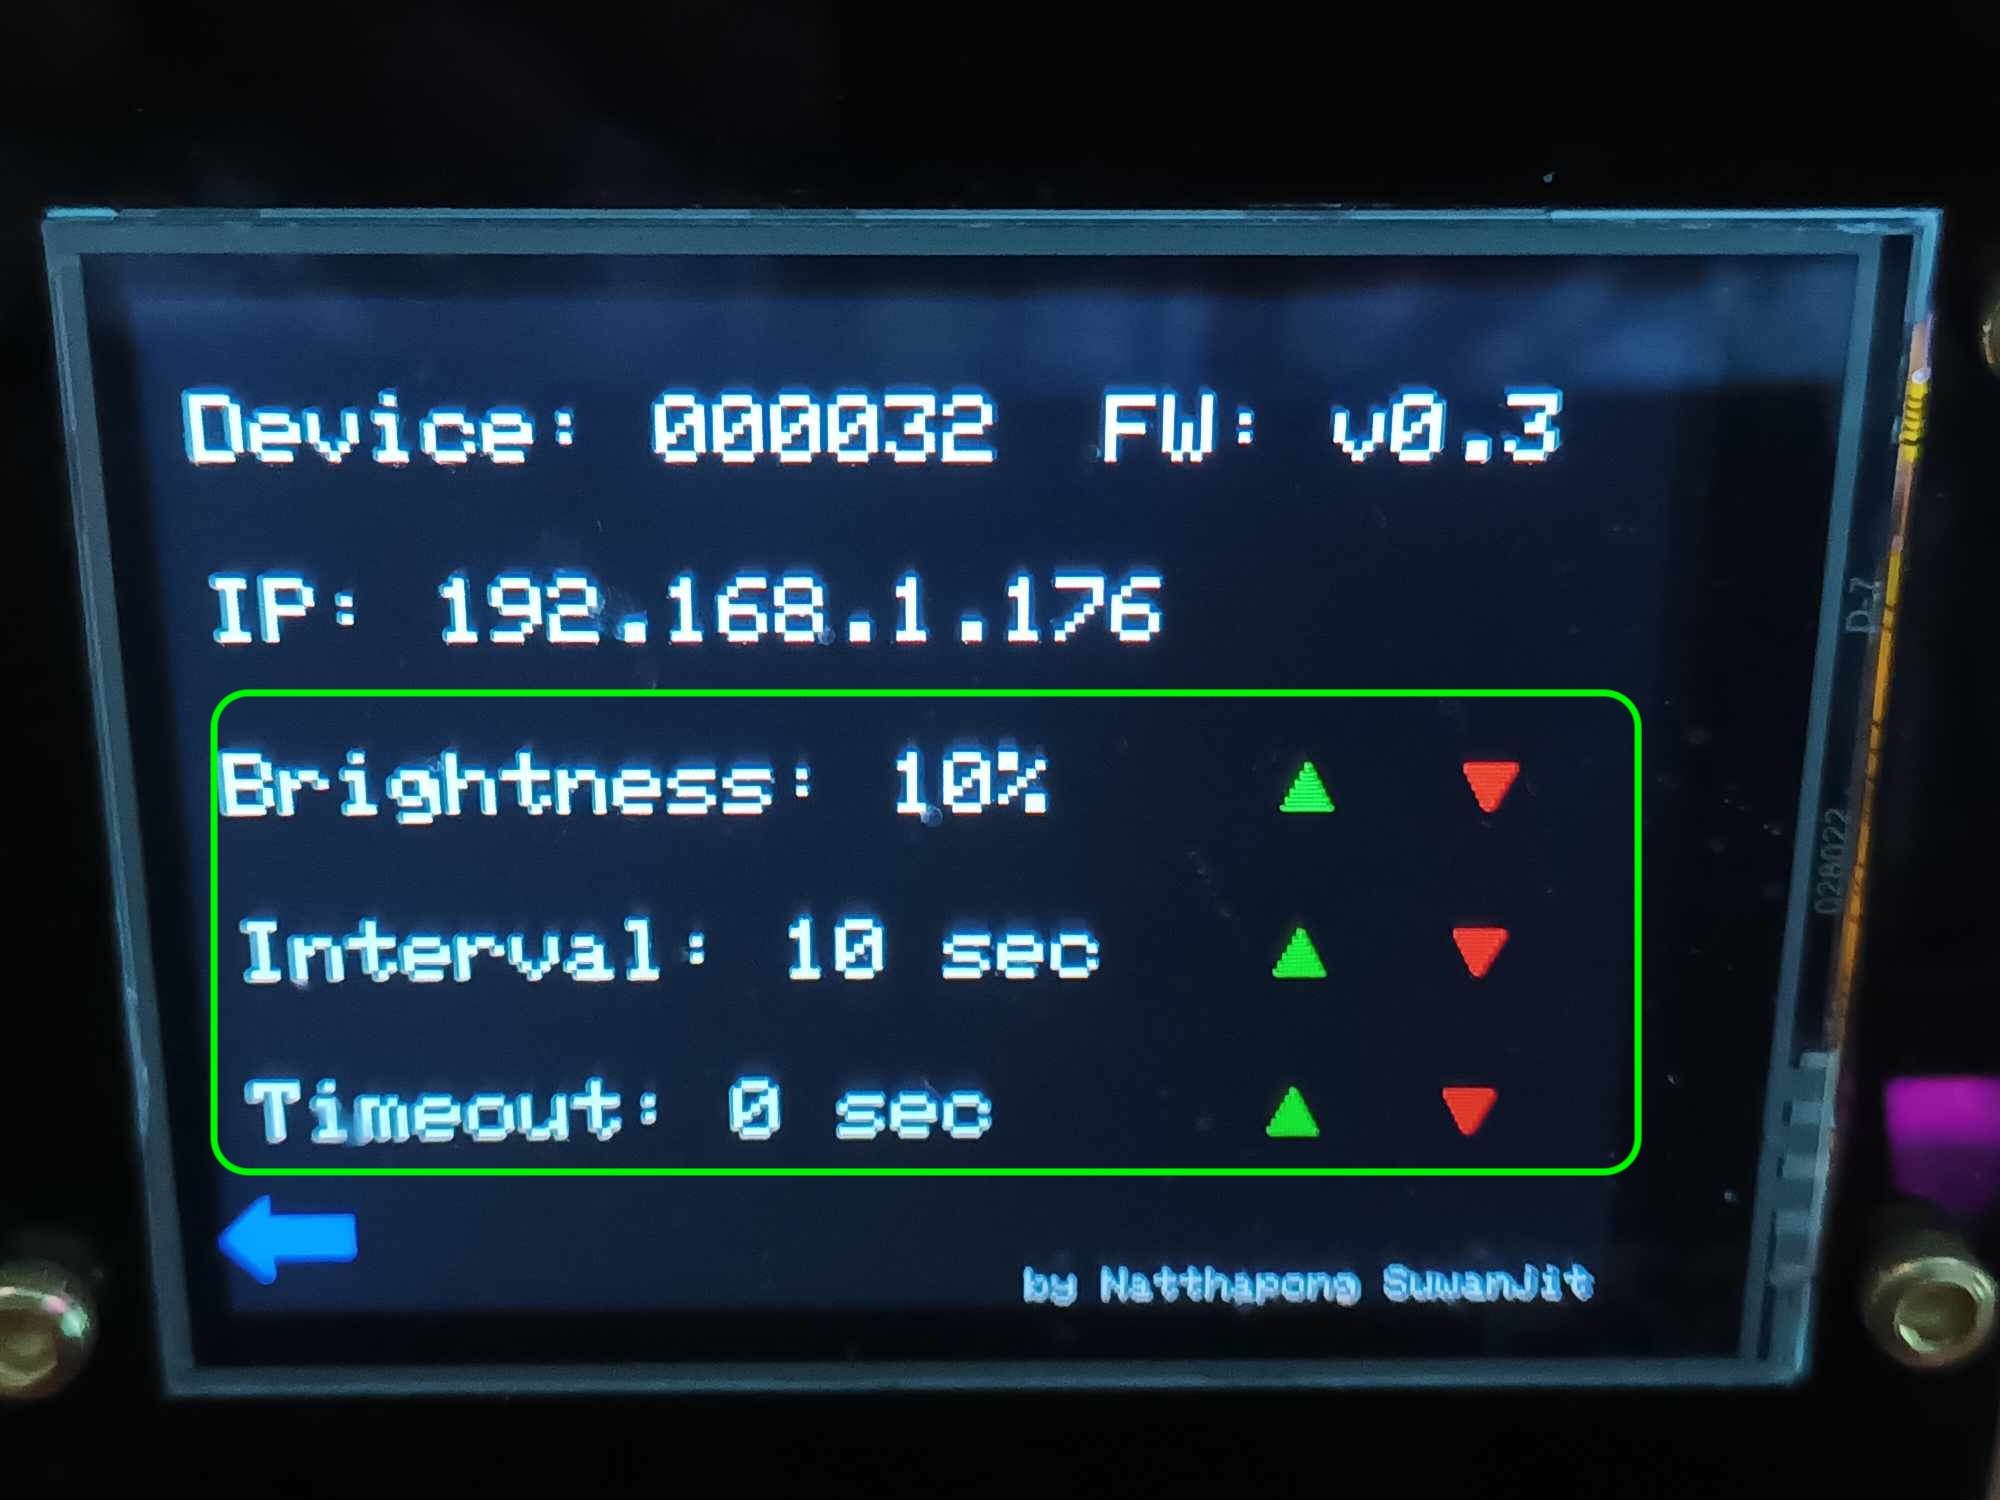
2.3.1 Details such as Device ID, Firmware version, and the
CryptoClock's IP address.
-
2.3.2 Various settings such as screen brightness, data
update interval, screen timeout, and up/down settings
buttons.
-
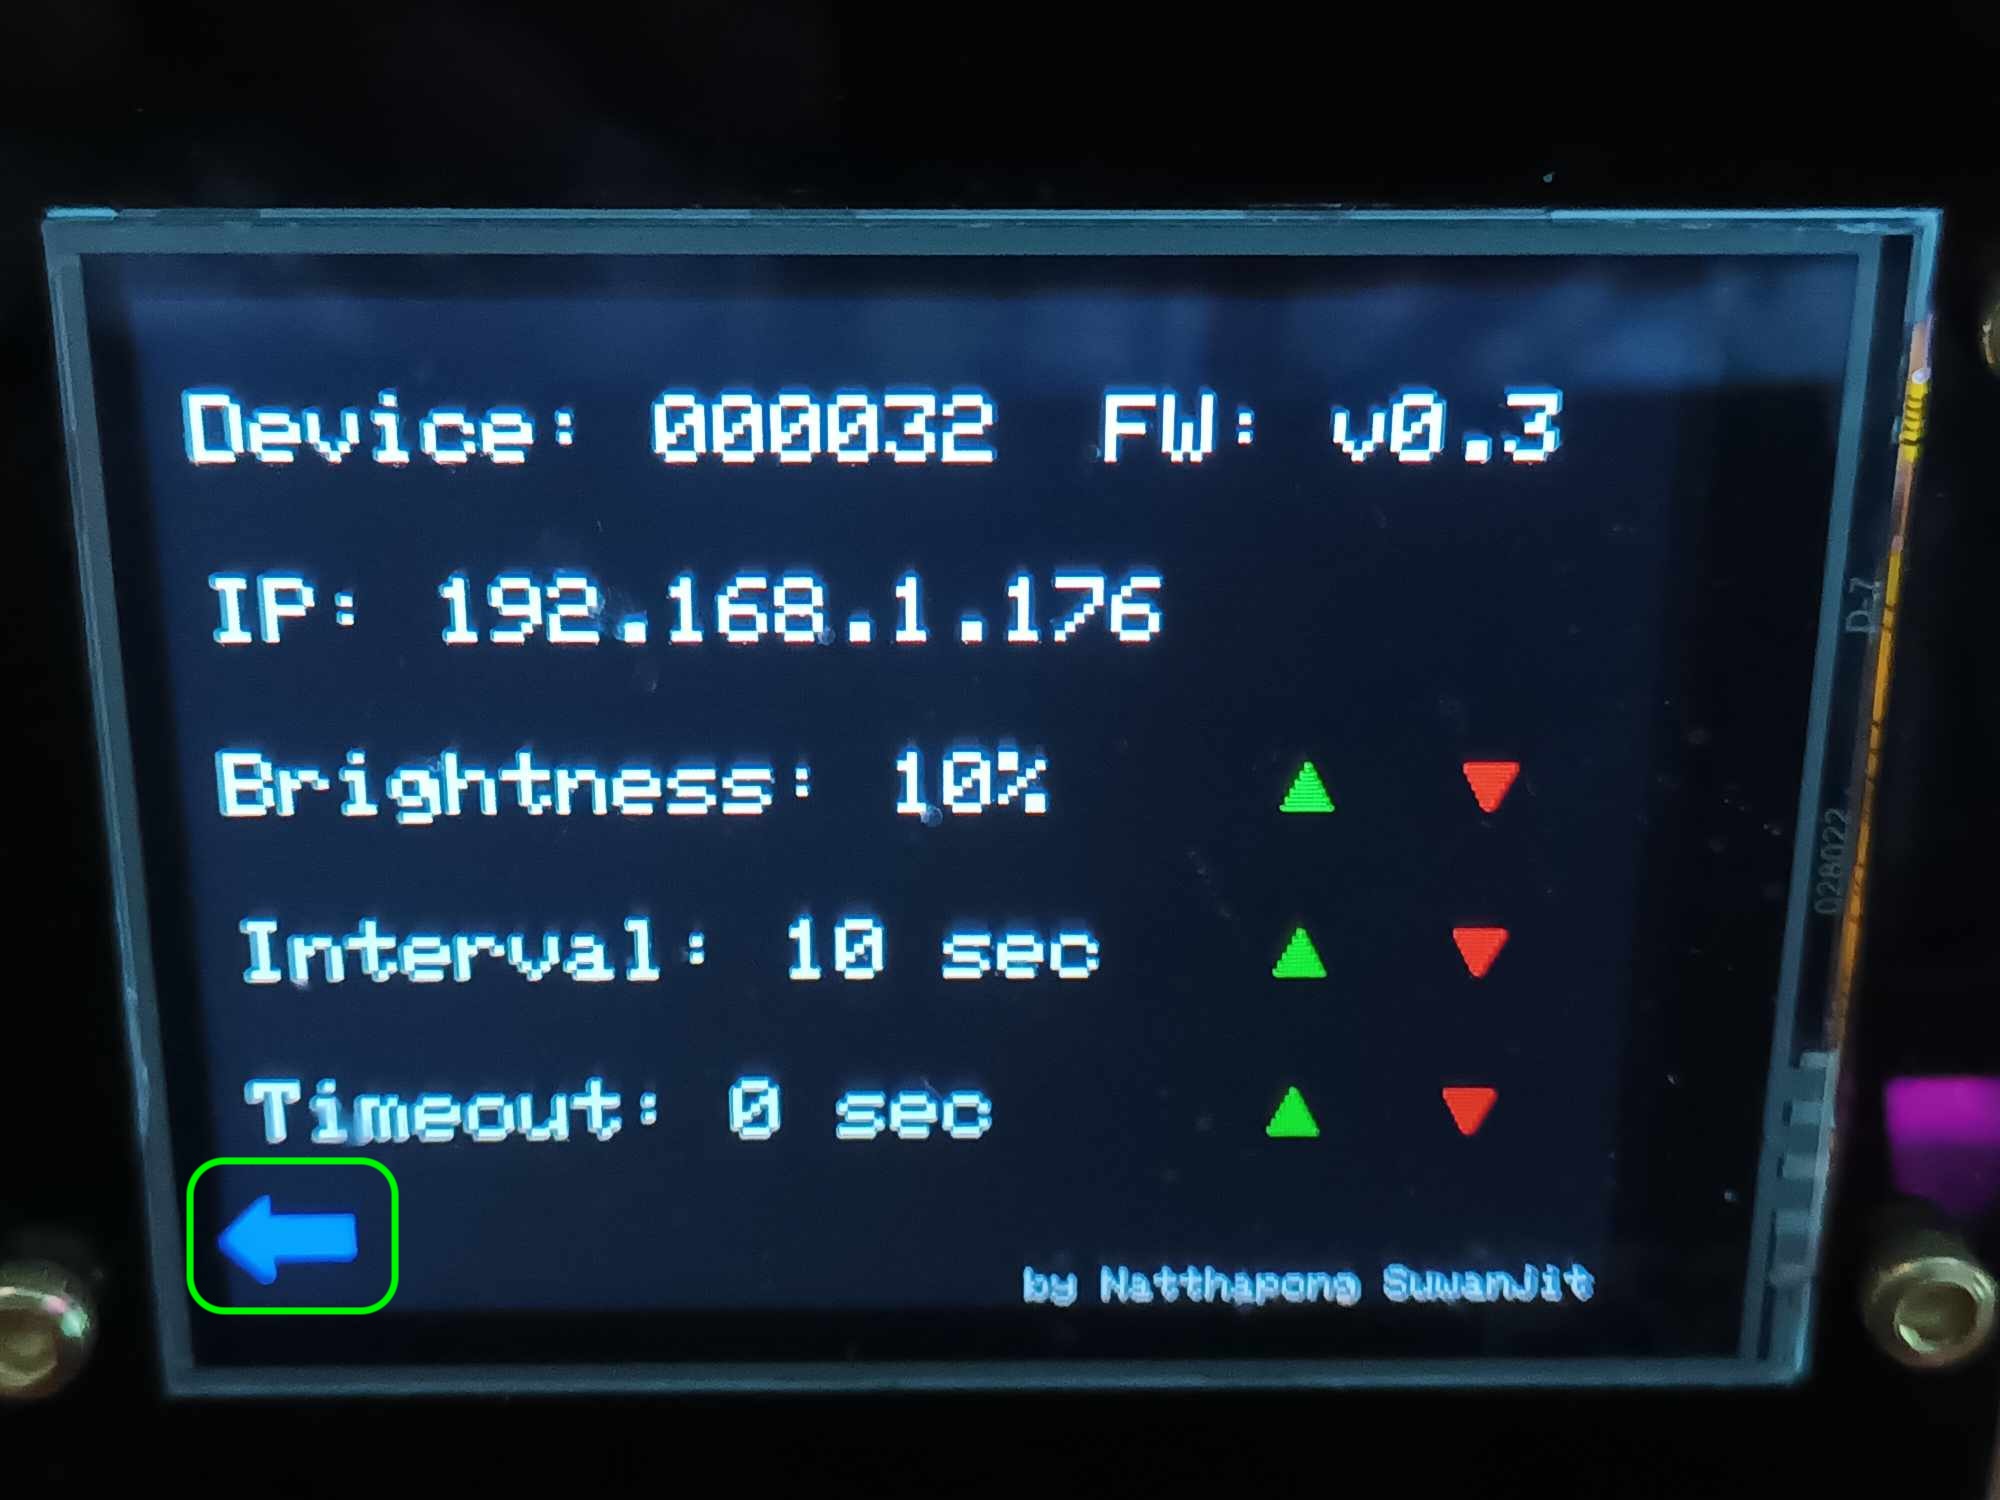
2.3.3 The back button to return to the cryptocurrency coin
display page.
-
2.3.4 Developer credit, myself (Natthaphong Suwanjit), thank
you for supporting the product. You can support the
developer with this QR Code.

-
2.3.1 Details such as Device ID, Firmware version, and the
CryptoClock's IP address.
Advanced Settings and Customization
3. Learn how to update data frequency, adjust screen brightness, and set screen timeout.
-
3.1 Adjusting settings for screen brightness, price update
interval, and screen timeout.

-
3.1.1 Adjusting screen brightness settings. Pressing the
up/down buttons increases/decreases brightness by 30%
(100->70->40->10).

-
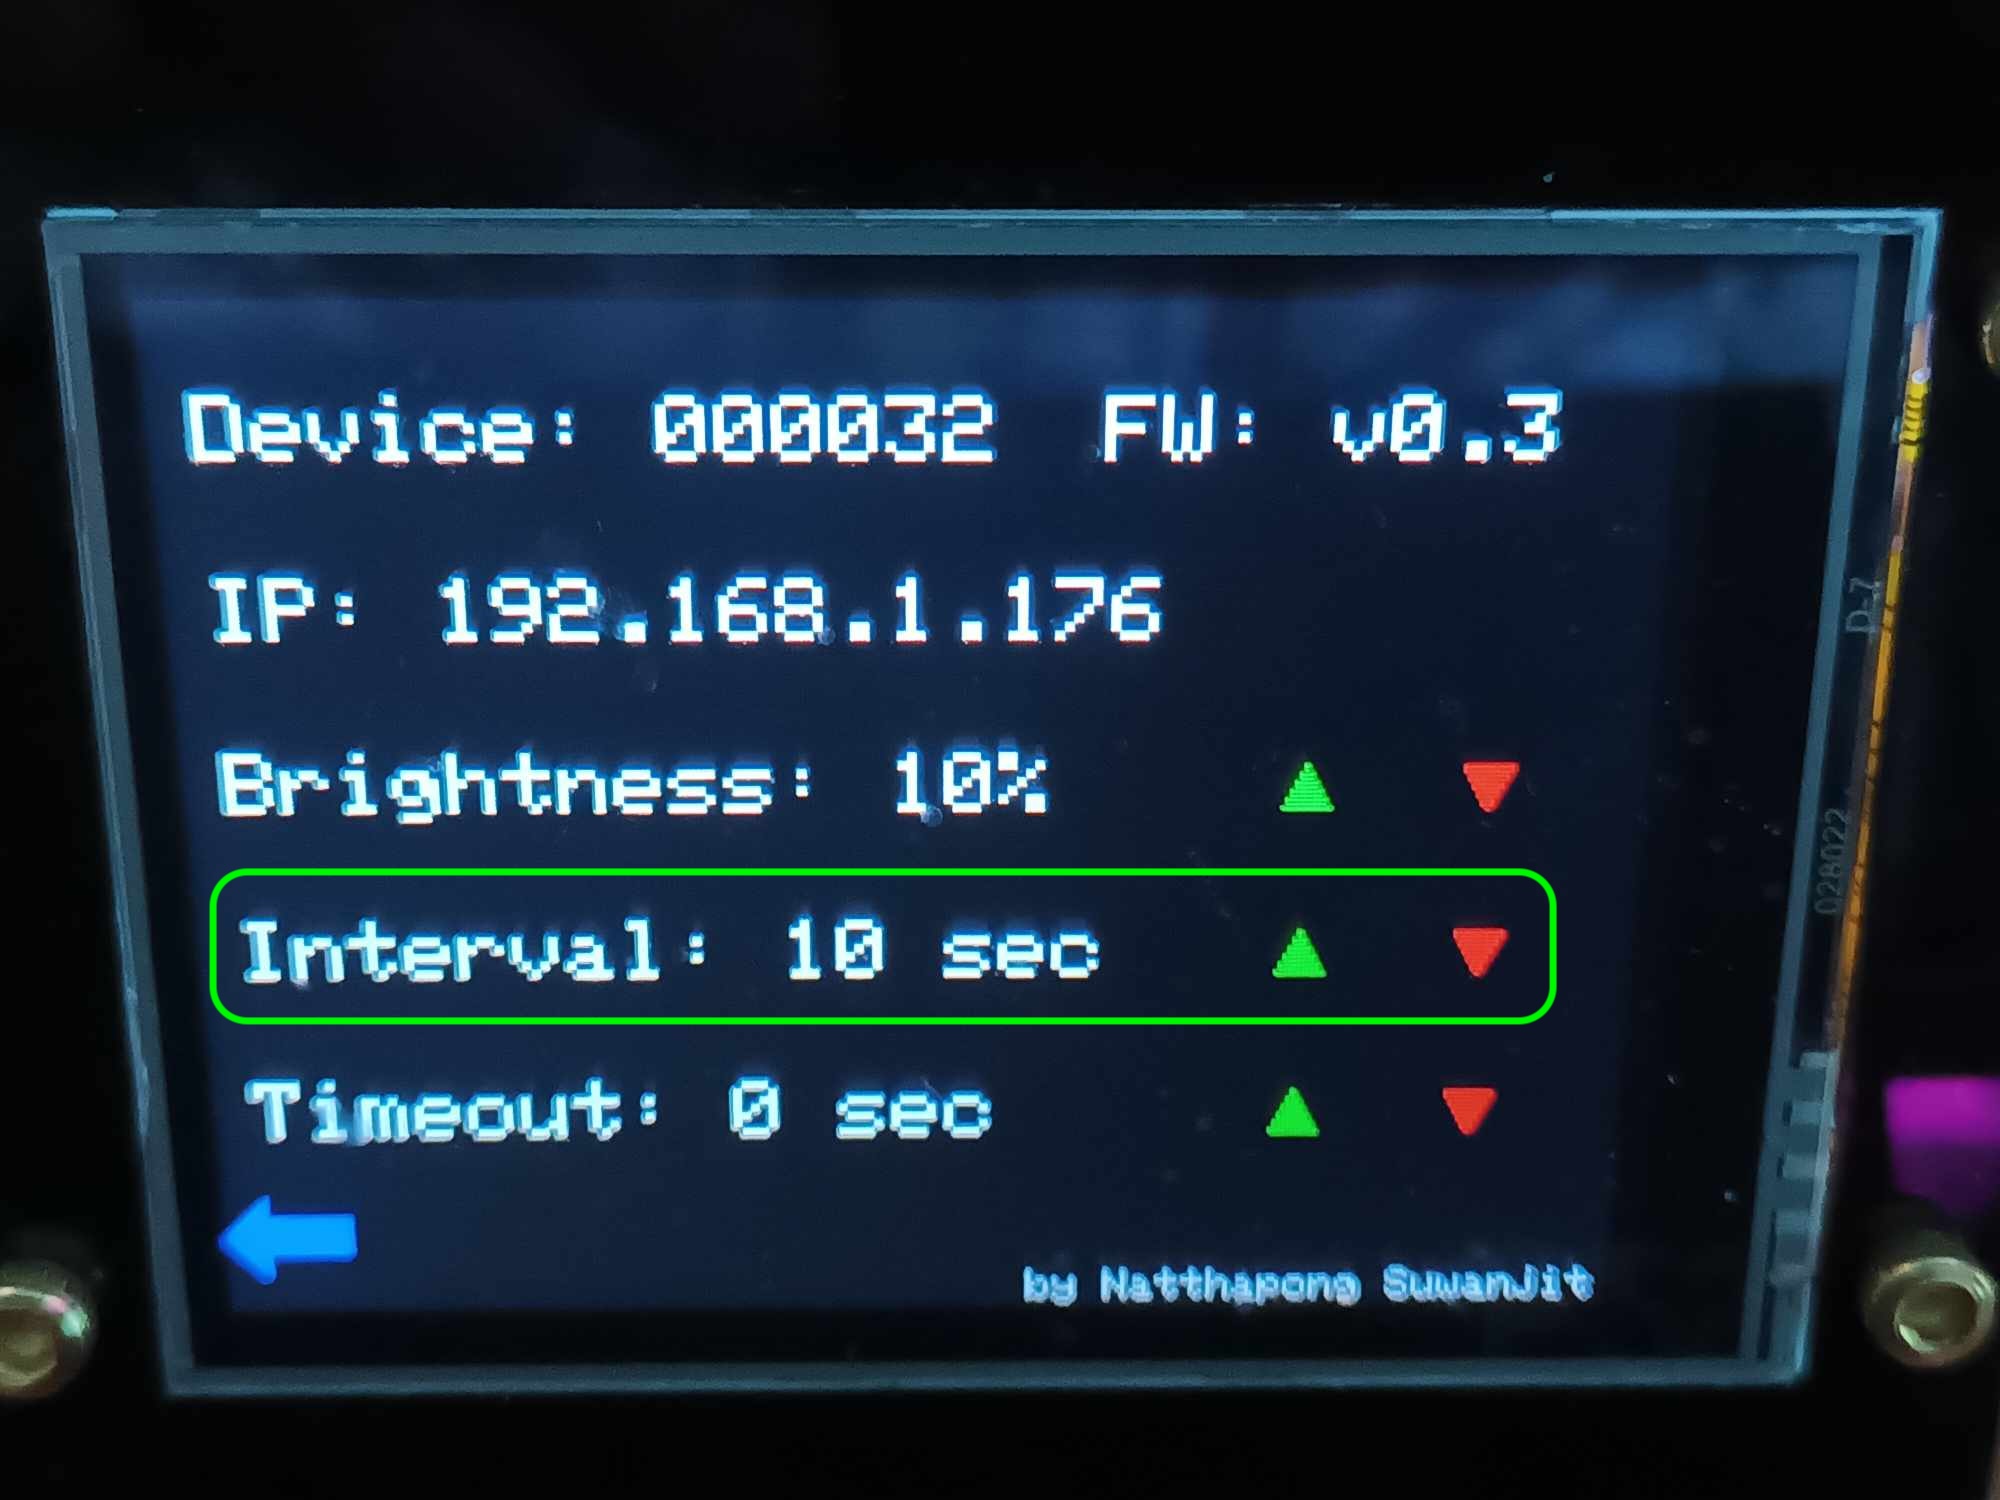
3.1.2 Adjusting the price update interval settings. It can
be set as (10, 30, 60, 120, 300).
-
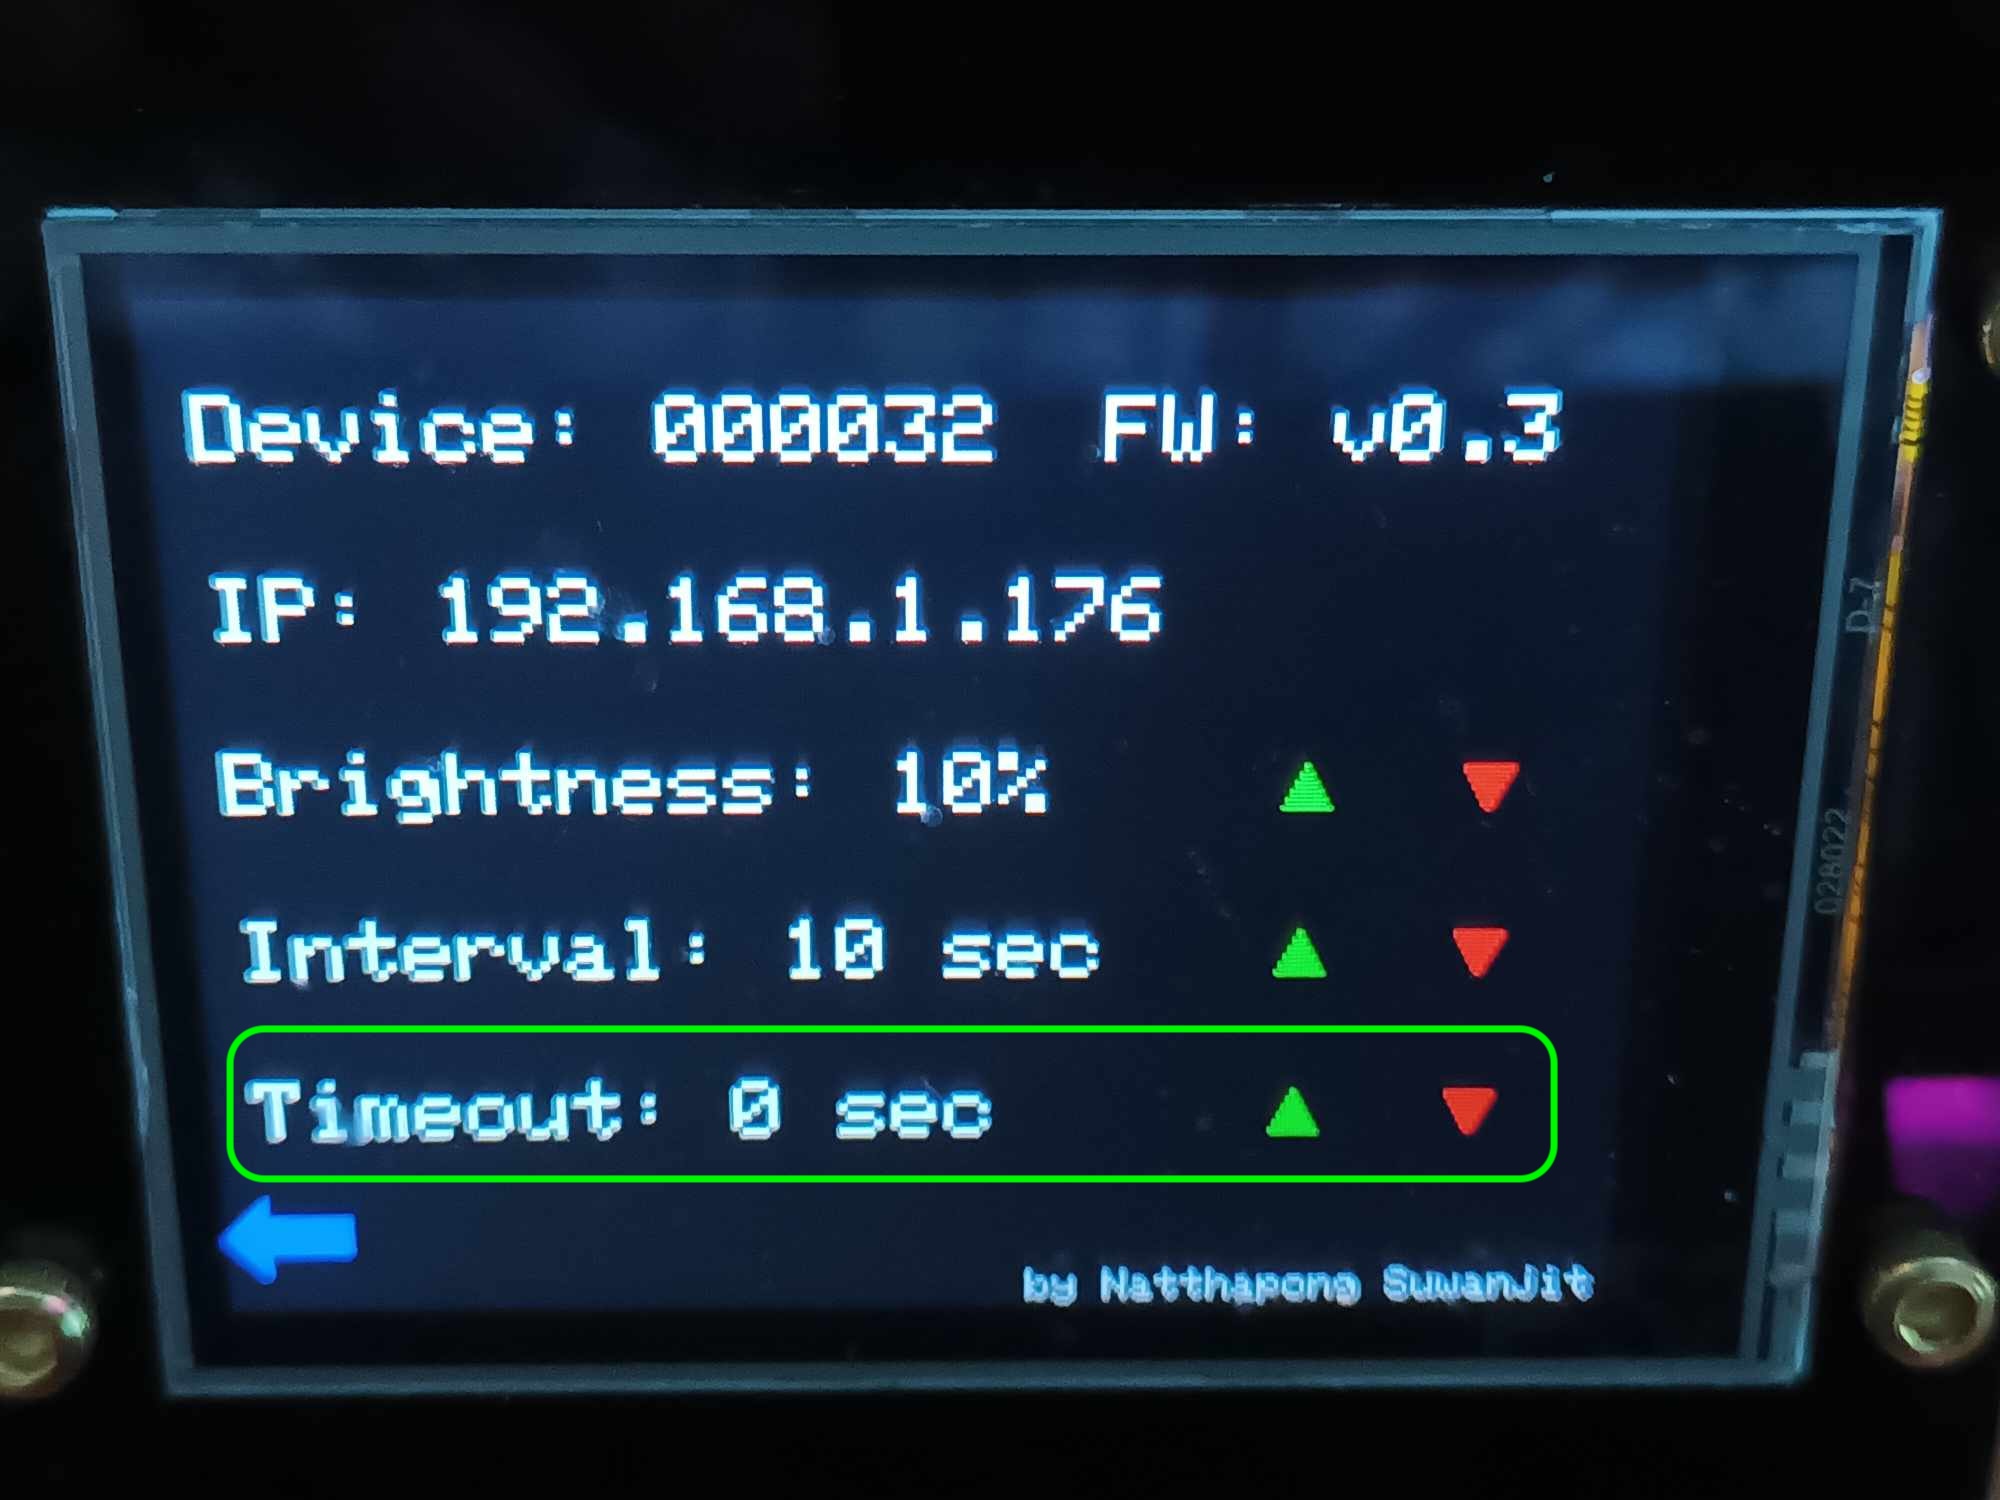
3.1.3 Adjusting the screen timeout settings. It can be set
as (0, 30, 60, 120, 300). Setting it to 0 means no timeout;
the screen will stay on continuously. Touching the screen
once restores the brightness to the previously set level.
-
3.1.1 Adjusting screen brightness settings. Pressing the
up/down buttons increases/decreases brightness by 30%
(100->70->40->10).
-
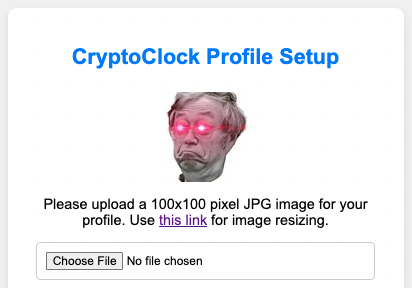
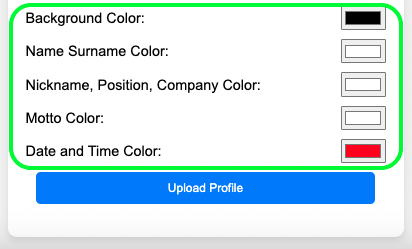
3.2 Adjusting personal user information and display settings.
This can be done by pressing on the profile picture, which
displays a QR Code and then using a phone within the same
network to scan it.

-
3.2.1 Uploading a profile picture. Only images with .jpg
extension and not exceeding 100x100 in size can be uploaded,
and a link is provided to convert the image.
-
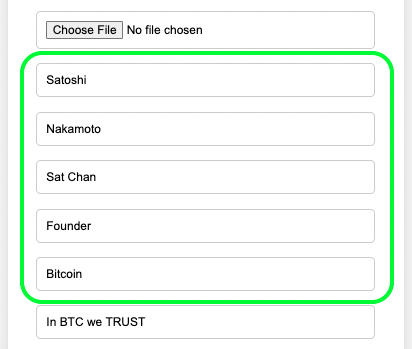
3.2.2 Adjusting other personal user information such as real
name, surname, nickname, position, and company or
affiliation (English only).
-
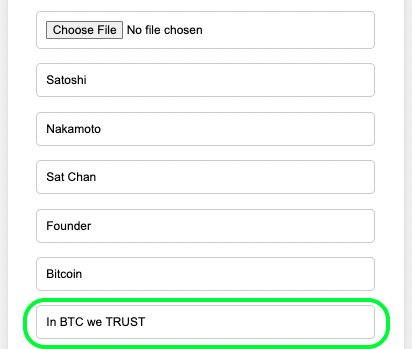
3.2.3 Adjusting Motto or slogan settings. It must not exceed
15 characters and is used to express our identity (English
only).
-
3.2.4 Adjusting the background and font colors.
-
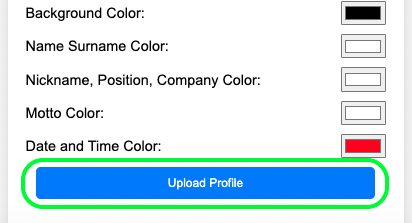
3.2.5 Profile upload button. Once pressed, it updates the
settings to our CryptoClock and it will automatically
restart.
-
3.2.6 Purchase channels for CryptoClock, can be accessed by
scanning a QRCode or through a link.

-
3.2.1 Uploading a profile picture. Only images with .jpg
extension and not exceeding 100x100 in size can be uploaded,
and a link is provided to convert the image.
-
3.3 Adjusting cryptocurrency coin settings.
-
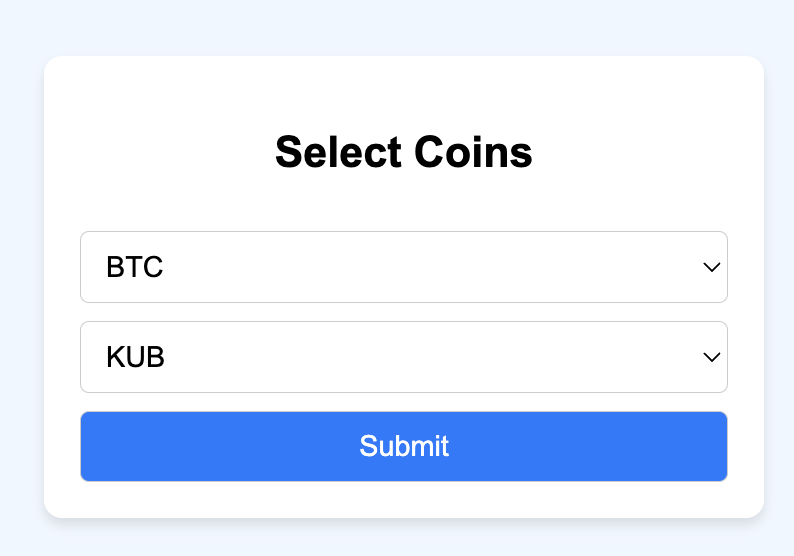
3.3.1 Step 1, click on the cryptocurrency coin logo at the
top center.
-
3.3.2 CryptoClock will display a QRCode, bring a mobile
phone to scan it or enter the browser and type the ip
address.

-
3.3.3 Enter the web page displaying coins, select a coin
from the list, and press the Submit button. Subsequently,
CryptoClock will restart itself and switch to the new coin.
-
3.3.1 Step 1, click on the cryptocurrency coin logo at the
top center.
API Integration
4. Details on how to connect to various exchange APIs to retrieve real-time cryptocurrency data.
- 4.1 Coin prices are primarily based on Binance and BitKUB Exchange.
- 4.2 For coins available on both platforms and paired with USDT, prices from Binance are displayed first.
- 4.3 For coins available on both platforms and paired with THB, prices from BitKUB are displayed first.
- 4.4 For coins not available on Binance and paired with USDT, they are divided by the USDT/THB rate from Binance.
- 4.5 For coins not available on BitKUB and paired with THB, they are multiplied by the USDT/THB rate from Binance.
Troubleshooting and Support
5. Tips for troubleshooting common issues and how to seek further help.
-
5.1 If the screen freezes or does not display, press the reset
button on the back of the screen (rim button).
- 5.2 If the coin logo does not match the selected one, press the coin logo to change it again.
- 5.3 If unable to display values from Cryptocurrency coins, check the internet signal, and also try turning the device off and on again.
- 5.3 CryptoClock uses a 5V/2A power supply; ensure the power source is correct before use.
Frequently Asked Questions (FAQ)
6. Answers to frequently asked questions about using your CryptoClock.
-
6.1. How do I connect my CryptoClock to Wi-Fi?
When powered on, if the CryptoClock has never been connected before, it will act as a Server for us to configure by connecting to SSID CryptoClock and scanning the QR Code.
-
6.2. How do I set the time and date on my
CryptoClock?
For those purchased in Thailand, it is not necessary to set the time and date as it will automatically update to universal time.
-
6.3. How do I add or remove cryptocurrencies I want to
follow?
You can click on the coin icon at the top center to enter the coin setting mode and scan the QR Code to select coins, with a typical capability to choose 2 coins in the standard version.
-
6.4. What should I do if my CryptoClock does not display
values or displays incorrect values?
Make sure your CryptoClock is connected to the internet. If there are still issues, try pressing the reset button on the back (rim button) to restart the device.
-
6.5. How do I update the firmware of my CryptoClock?
Currently, updates are not available, but you can set your profile by long-pressing the profile picture and scanning the QR Code.